
Do you hear that?
Faint right now. Easy to ignore when nothing is actually broken and the board is already full. But it has been getting a little louder every month.
If you’ve seen The Two Towers you know the sound I mean. Not the battle. The part before the battle, where everybody is standing on the Deeping Wall in the rain watching torches come over the hill, and the only thing anybody can hear is the marching.
Follow the sound back far enough and it resolves into a date: October 2027, when vSphere 8 goes end of general support.
That’s the thing about an army on the march. It doesn’t negotiate. It doesn’t slip a quarter because yours got busy. It just keeps getting closer, and the only variable you actually control is how much you’ve shored up before it arrives.
So you went looking for a plan, which is roughly how you ended up here. I’ll skip the part where I pretend to be an oracle. I’m a guy who ran this on a real environment with real leftover junk in it, wrote down the places that weren’t well documented, and is handing you the notes.
What we’re working with
Before anybody shores up a wall they take stock of what’s in the armory. The road to VCF 9 forks a lot, especially if you already run a decent chunk of the VMware suite, so this is one environment’s inventory and one environment’s route. Yours will fork somewhere mine didn’t.
Here’s the starting line:
- vCenter 8.0 U3e (build 24674346), one datacenter, one cluster
- Four ESXi hosts on 8.0 U3d (build 24585383), all Cisco UCSC-C220-M6S
- Xeon Gold 6326 (Ice Lake-SP), one socket, 16 cores, 256 GB per host. A terabyte of RAM across the cluster, which matters later
- 40 VMs, 30 powered on, one template
- Pure FlashArray underneath, with VMFS, vVol and NFS datastores all mounted
- vLCM running baselines, not images (this is a blocker, and we’ll get there)
- DRS fully automated. HA enabled but admission control off. EVC not configured
- A Pure Storage vSphere plugin and Cisco Intersight Assist registered as extensions
- And the fun part: 29 registered extensions left over from a Site Recovery Manager install, plus a third vCenter and Enhanced Linked Mode
At a higher level, we have 3 vCenter environments. One is staying on 8 for a while, and the other two are what we are working on. vc02 will be our primary VCF vCenter going to 9, while vc03 gets deprecated. vc02 and vc03 each had two esxi hosts to demonstrate SRM setup with SRA’s and failover integration.
While everyone’s journey will be different, I can see this upgrade matching a number of customers I talk to. Nobody’s greenfield. Everybody has a decommissioned product still holding registrations and a vCenter that exists for reasons nobody present can fully explain. Not exactly the army of the West, but it’s what we’ve got.
What had to happen first
Before any of the VCF 9 work could start, the 8 environment needed tidying. None of this is VCF 9 content exactly, but skipping it would have blocked everything downstream:
- Uninstall SRM and verify nothing was left behind (29 extensions remained, zero of them
vcDrorcom.vmware.dr.*, so it came out clean) - Collapse vc03 into vc02, and while doing it, dissolve the SSO and Enhanced Linked Mode configuration. ELM isn’t optional cleanup here. Converge explicitly doesn’t support vCenter instances with ELM, so this one was load-bearing
- Transition cluster-prod from vLCM baselines to images. Starting with VCF 9.0 only image-managed clusters are supported, and you can’t upgrade to ESX 9 without it
With that done, the route looked like this:
1. vLCM baselines to images
2. Deploy VCF Operations 9.1     <- before the vCenter upgrade
3. Deploy and register the License Server
4. Upgrade vCenter    8.0 U3e -> 9.1
5. Upgrade ESX        8.0 U3d -> 9.1
6. Converge via VCF Installer
7. Post-converge validation
This post is steps two and three.
Why VCF Operations goes first
In 9.x, VCF Operations is the licensing and lifecycle control plane. vCenter 9.1 draws its entitlement through the License Server, and the License Server registers to VCF Operations.
So the dependency runs backward from how a lot of us built these environments. The monitoring piece is now the thing that has to exist first, and KB 440630 covers what happens if you go the other way (licensing failures after the vCenter upgrade). There are other valid routes to 9. This is just the one that follows the dependency instead of fighting it.
Steps two and three are also the cheap part of the whole project. No maintenance window, nothing disruptive, and if you hate the result you power the appliances off and delete them with zero impact on vSphere. Good place to start when the marching is still distant.
What You’ll Need
- Forward and reverse DNS for both appliances, resolving. Do this before you start, not while a wizard is yelling at you.
- An NTP server the appliances can actually reach.
- A password you can live with. Fifteen character minimum, set once at the start.
- A decision on sizing. I’m running Simple tier throughout on four hosts, so this is a single node. HA or Continuous Availability and some of the screens below will look different.
Two OVAs, not one. This is the part worth being deliberate about, because the License Server is a separate appliance and it’s easy to scroll right past on the download page:
| VCF Operations 9.1 | VCF License Server | |
|---|---|---|
| Where | Broadcom Support Portal, VCF 9.1 downloads | Broadcom Support Portal (the Add License Server page links you straight there) |
| Build I used | 9.1.0.0400 | 9.1.0.0400.25541557 |
| Appliance name | VCF Operations | VCF License Server Appliance |
| Footprint | Sized by tier (Simple here) | 2 vCPU, 4 GB RAM, 12 GB disk |
| How many | One cluster | One per fleet is the normal answer |
| Deploy to | vCenter | vCenter (it has to land on an instance you manage) |
A few things about the License Server specifically that aren’t obvious until you’re standing in the OVF wizard:
- It’s tiny. Two vCPUs and 4 GB. If you were bracing for another VCF Operations-sized appliance, you’re not.
- You need a static IP, a resolvable FQDN, and a gateway at deploy time, same as any appliance. Mine went to
vcf-lic-server.fsa.lab. Get forward and reverse DNS in place first. - The Unique Registration Key is an OVF property. It isn’t something you type into a UI after the fact, it’s injected at deploy time, which is exactly why Step 14 below matters so much. Have the key on your clipboard before you start the import, not after.
- One per fleet is the default, and Broadcom says as much on the Add License Server page. More than one is for edge sites with limited connectivity, not for redundancy in a single datacenter.
- Your Broadcom support portal credentials with a VCF entitlement attached. Registration pulls the entitlement from your account, so if nobody on your team can log into the portal with the contract attached, stop and solve that first. Nothing downstream works without it.
Part One: VCF Operations
Step 1: Get Started (Pick Your Install)
Browse to the appliance and you land here. Three doors.
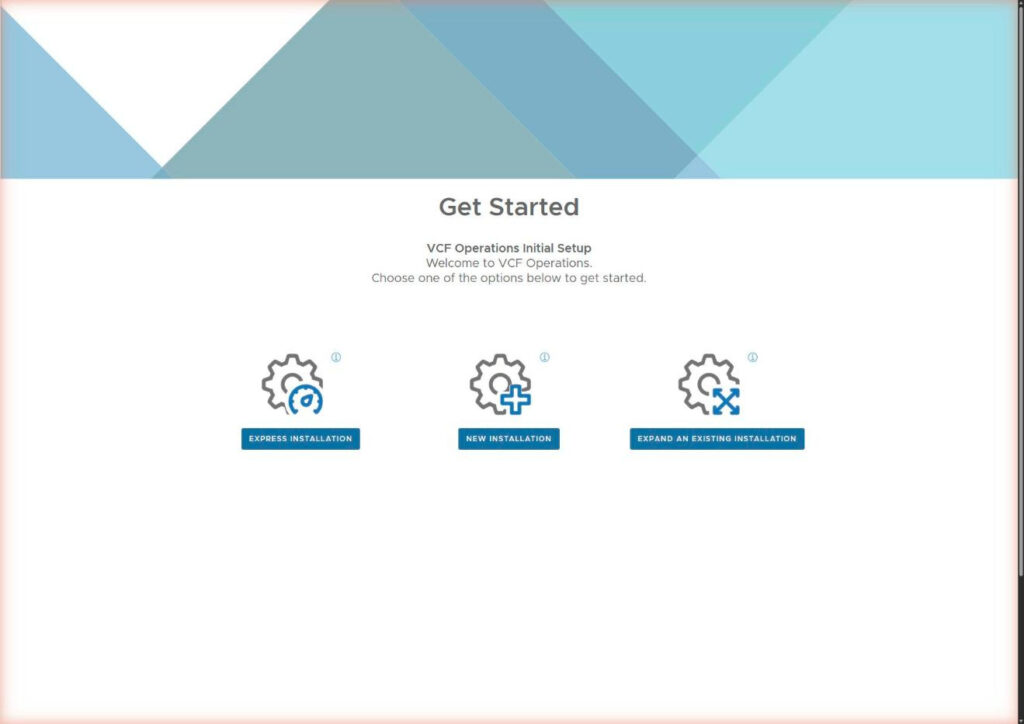
Express Installation is the speedrun (single node, defaults, minimal prompting). Expand an Existing Installation adds a node to a cluster you already built. New Installation is the full wizard, and it’s the one I want, because I’d rather see every setting than find out later what a default decided on my behalf.
Click New Installation and you get the roadmap screen.
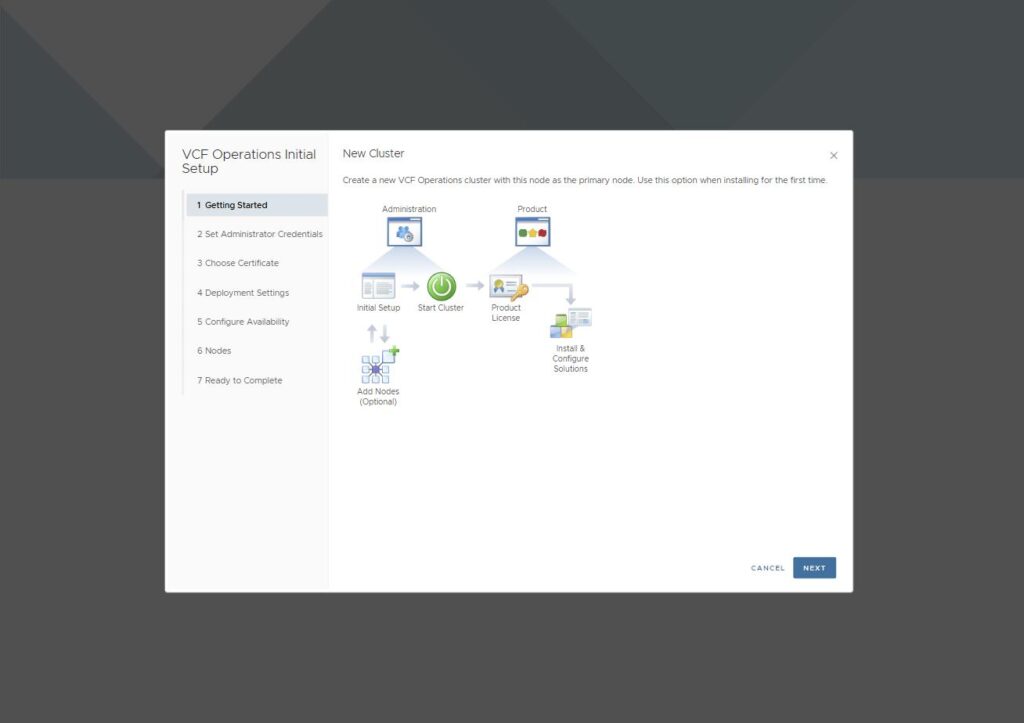
Worth two seconds on that diagram, because it’s telling you something. Product License is a separate box downstream of Start Cluster. That’s the License Server appliance from step three, and it doesn’t exist yet. We’re not skipping it, we just can’t do it from here.
Step 2: Set the Administrator Password
Username is admin and you don’t get to change it.
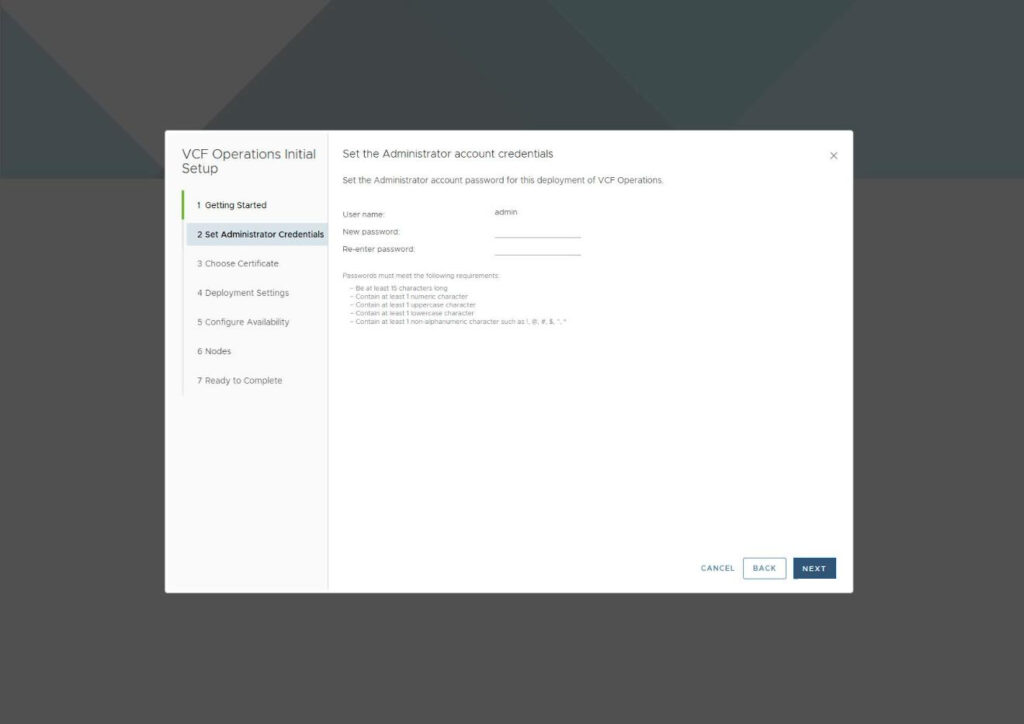
Requirements are on screen: fifteen characters minimum, one number, one uppercase, one lowercase, one special. Fifteen is longer than most people’s muscle memory, so pick something you can actually type at 11pm during the vCenter window.
Step 3: Choose a Certificate
Default certificates or bring your own PEM.
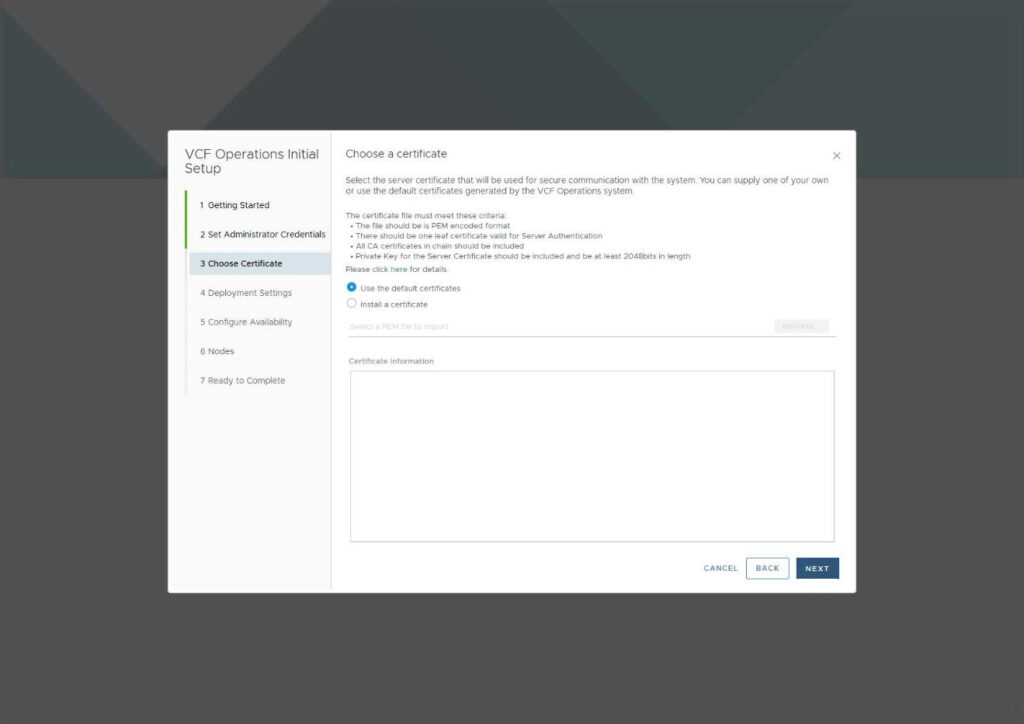
I took the default. If you’re installing your own, the criteria are on the screen (PEM encoded, one leaf cert valid for Server Authentication, the full CA chain, private key of at least 2048 bits). The chain is the one that trips people, partial chains fail validation and the error isn’t chatty about why.
You can replace the certificate later, so this isn’t a one-way door.
Step 4: Deployment Settings
Two fields. A name for the primary node, and NTP.
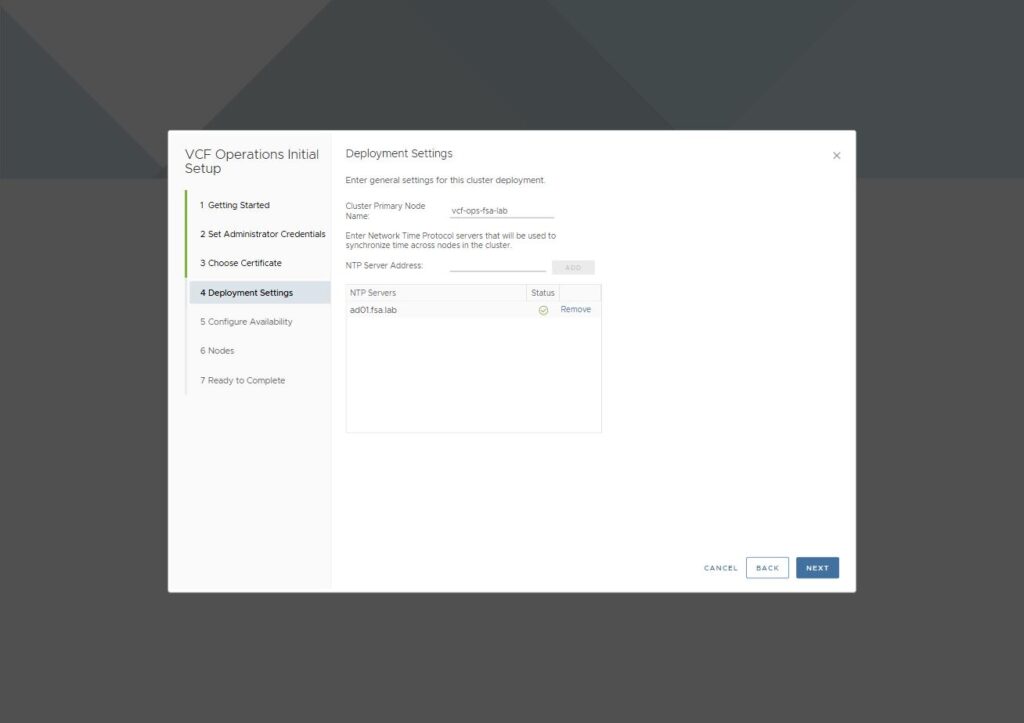
Keep the node name simple and clean. No underscores, no exotic characters. I matched mine to the short hostname so future me isn’t cross-referencing anything.
One thing I’ll give this wizard credit for: it actually tests the NTP server before letting you continue. It reaches out, tries to sync, and refuses if it can’t, rather than accepting a string and writing it to a config file for you to discover three phases later. That’s the right behavior, because time skew in a VCF deployment doesn’t announce itself as “your clock is wrong.” It shows up as certificate validation failures, odd authentication behavior, and converge pre-checks failing for reasons that look nothing like time.
Tip: Use the same time source your hosts already use: don’t pick an NTP server for this appliance in isolation. Go look at what vCenter and your ESX hosts are actually pointed at and match it. Consistency across vCenter, the hosts, and VCF Operations is a pre-flight gate later in the upgrade, and it’s cheaper to get right now than to reconcile after you’ve got four appliances deployed.
Step 5: Configure Availability
Availability Mode is a toggle, and it’s off by default.
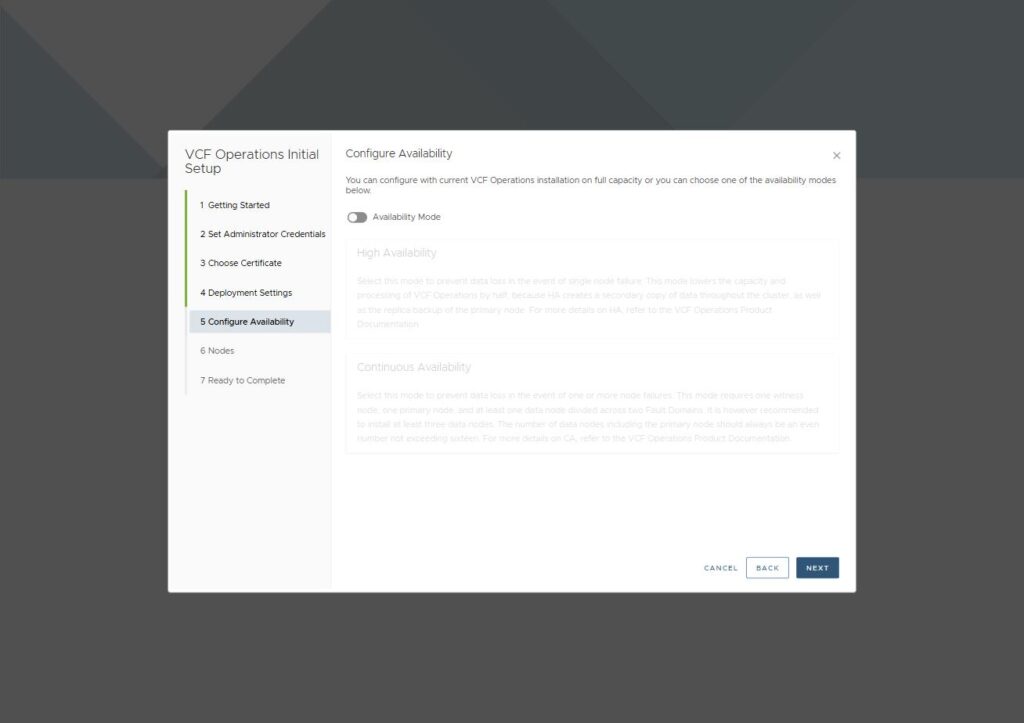
With it off, both High Availability and Continuous Availability grey out and you’re deploying a single node.
Read the HA description on that screen, because it’s honest in a way product UI usually isn’t: HA “lowers the capacity and processing of VCF Operations by half, because HA creates a secondary copy of data throughout the cluster.” That’s the trade, stated plainly. You buy resilience with half your capacity. Continuous Availability is a bigger ask again (a witness node, a primary, and at least one data node split across two fault domains, three data nodes recommended).
I’m running four hosts with a management plane and production workloads sharing a failure boundary. Four is a floor, not a comfortable baseline, and every gigabyte of RAM spent on redundancy in the management plane is one the workloads don’t get. So Simple tier throughout, single node here, and NSX Manager as a single node at converge time (that one’s a 48 GB swing by itself). Deliberate lab-scale decision, and I’d size it differently if it were carrying somebody’s production.
Step 6: Nodes
Empty table. Nothing to do.
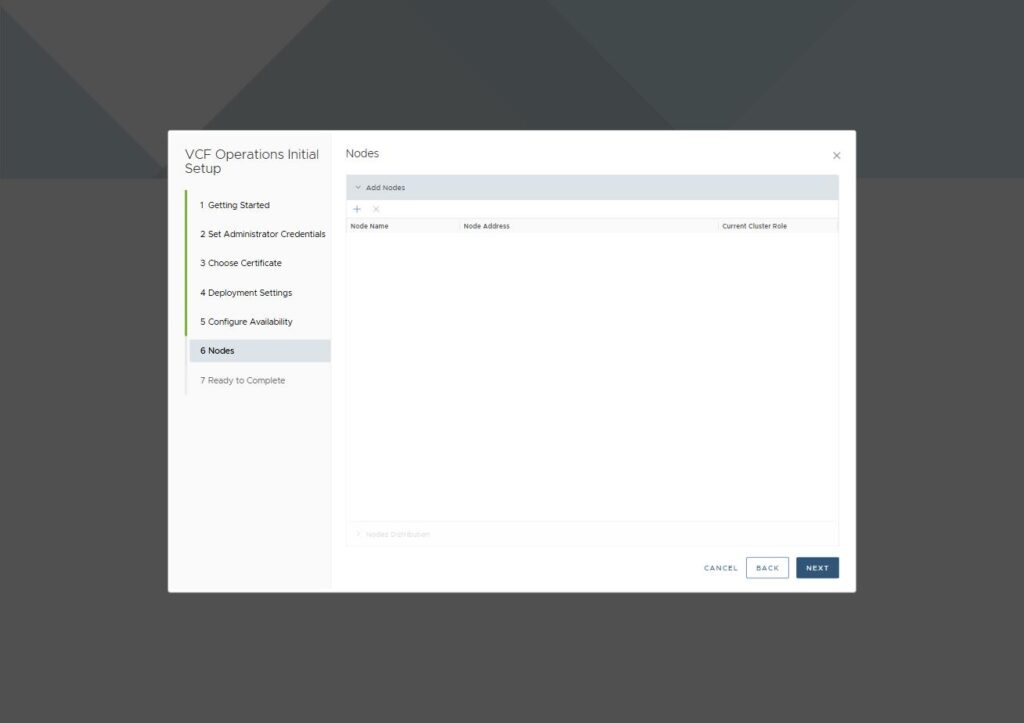
This is where data nodes would go. Single node, so we walk past it. The primary you just named is implied.
Step 7: Ready to Complete
Same roadmap from the start, except Initial Setup has a blue check on it now.
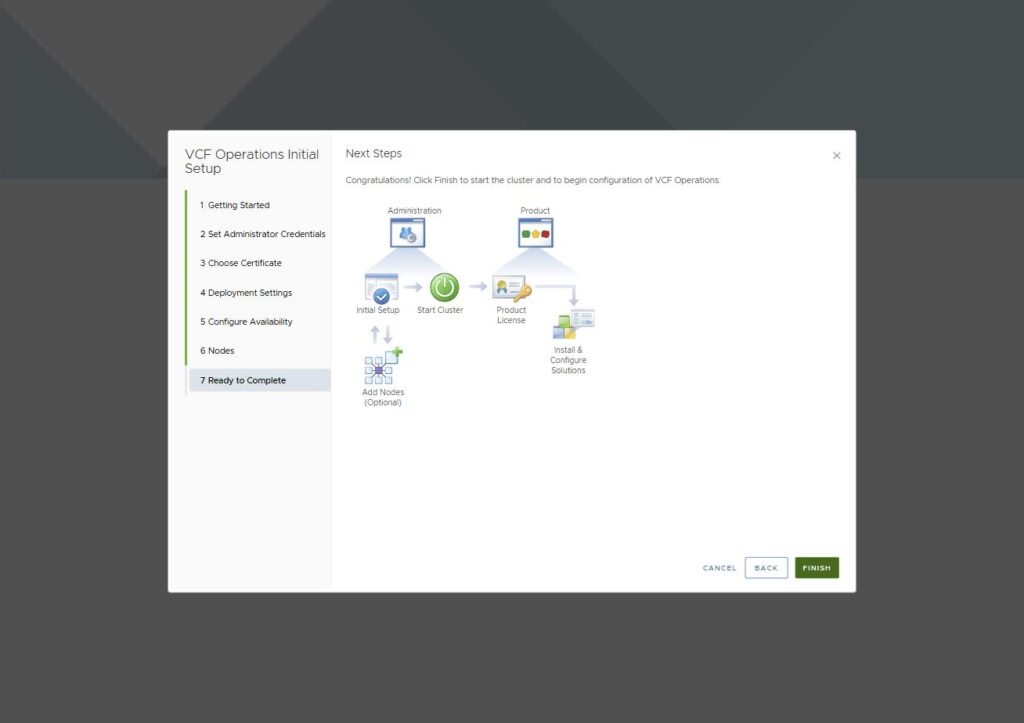
FINISH is green and waiting. This is your last cheap moment to change anything, so it’s worth walking the left rail once to confirm each step reads the way you meant it.
Step 8: Start the Cluster
FINISH completes the wizard and drops you into the VCF Operations Administration console, where Cluster Status reads Configuring with “Preparing node for first use” underneath and an empty Nodes table.
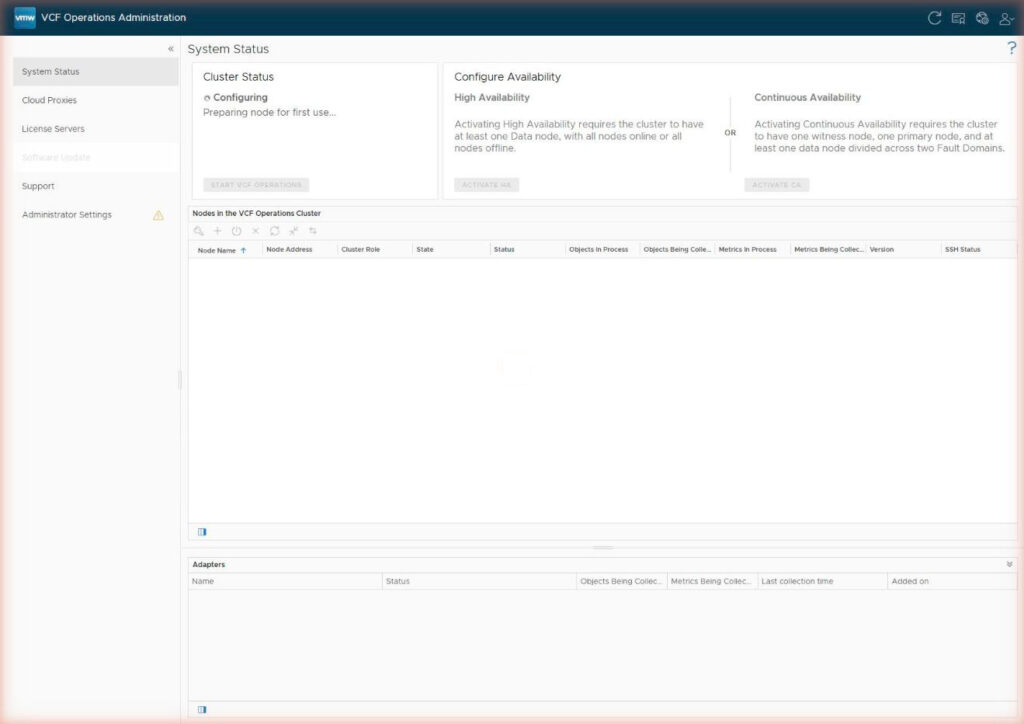
On my install it didn’t go any further on its own. That screen isn’t a progress bar, it’s a waiting room, and the START VCF OPERATIONS button in the first panel is the actual ignition. Click it.
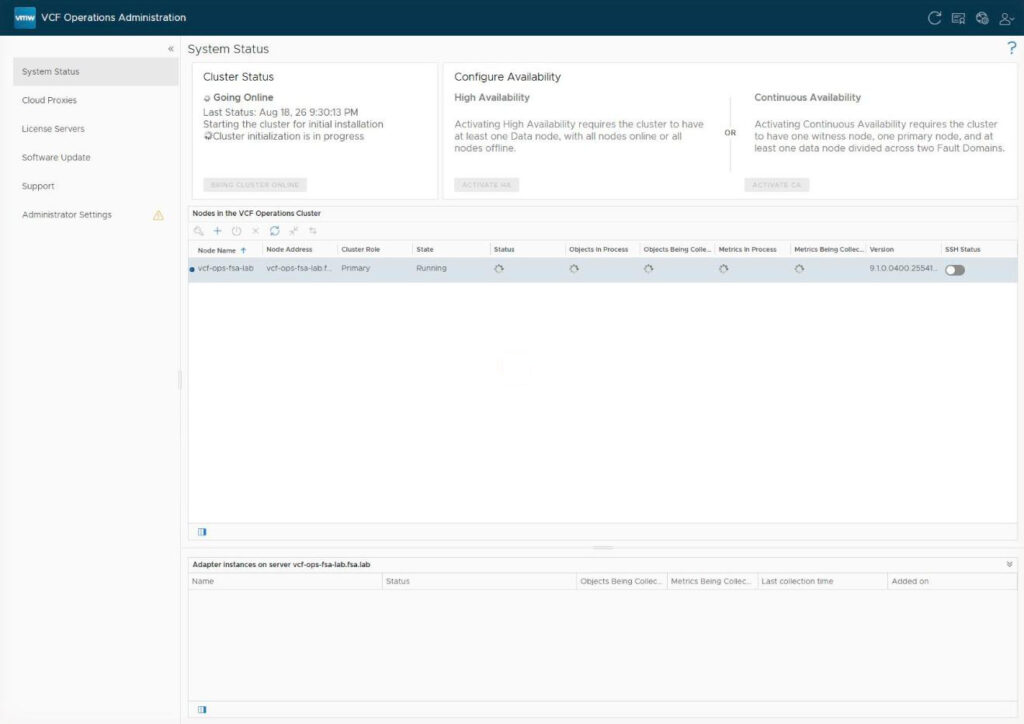
Status flips to Going Online with a timestamp on Last Status, the Nodes table populates (vcf-ops-fsa-lab, Primary, Running, 9.1.0), every metrics column starts spinning, and Software Update wakes up in the left nav. Ten to thirty minutes from here. Go get coffee, don’t refresh aggressively, and don’t decide halfway through that you picked the wrong node name.
Two bits of foreshadowing on this page while you wait. Configure Availability is right there, spelling out exactly what each mode would cost you in hardware, so the door I walked past in step 5 isn’t locked, it’s just going to ask for nodes I chose not to spend. And License Servers is sitting in the left nav as its own section, which is step three waiting for me.
Step 9: There’s a Second Wizard
Log into the product UI at the FQDN and you don’t get a dashboard. You get VCF Operations Configuration, a whole second four-step wizard.
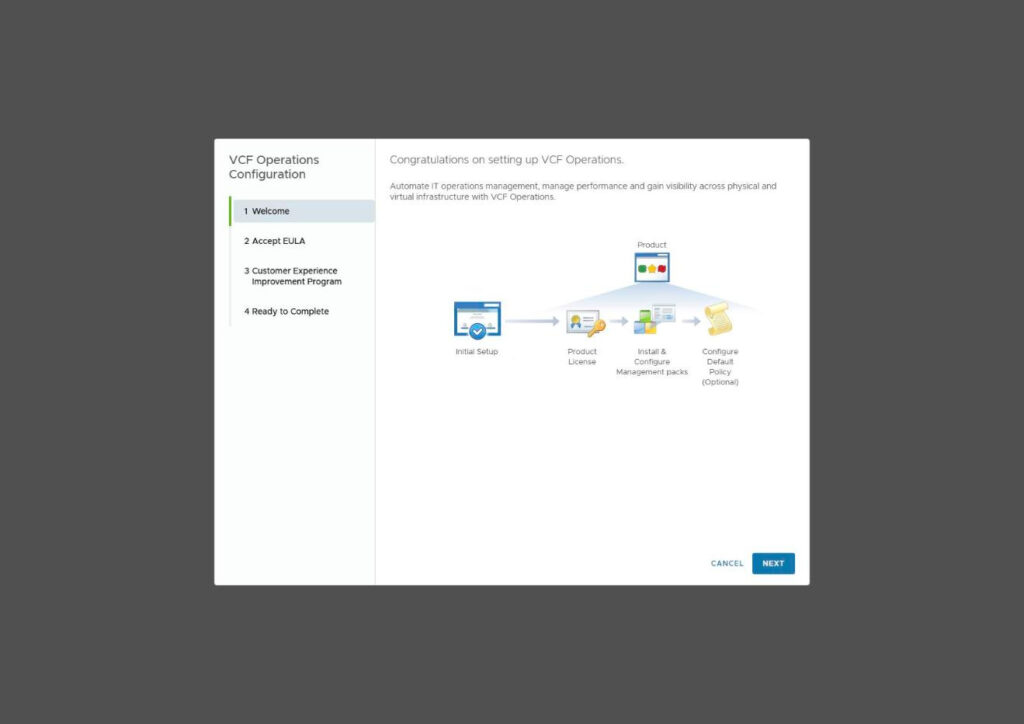
The first wizard built the cluster from the appliance’s admin console. This one configures the product. Welcome, EULA, CEIP, Ready to Complete.
The EULA is the Broadcom Foundation Agreement and you tick the box to move on. CEIP is informational only, there’s no toggle: it tells you that if you want to participate you set the property to True later from Global Settings. So the default is out and you can opt in whenever.
The roadmap here is the same one redrawn: Initial Setup (checked), Product License, Install & Configure Management packs, Configure Default Policy. Product License still unchecked.
Finish installs the default management packs and drops you straight into Add Account – vCenter, which is convenient, because that’s where we’re going.
Step 10: Add vCenter
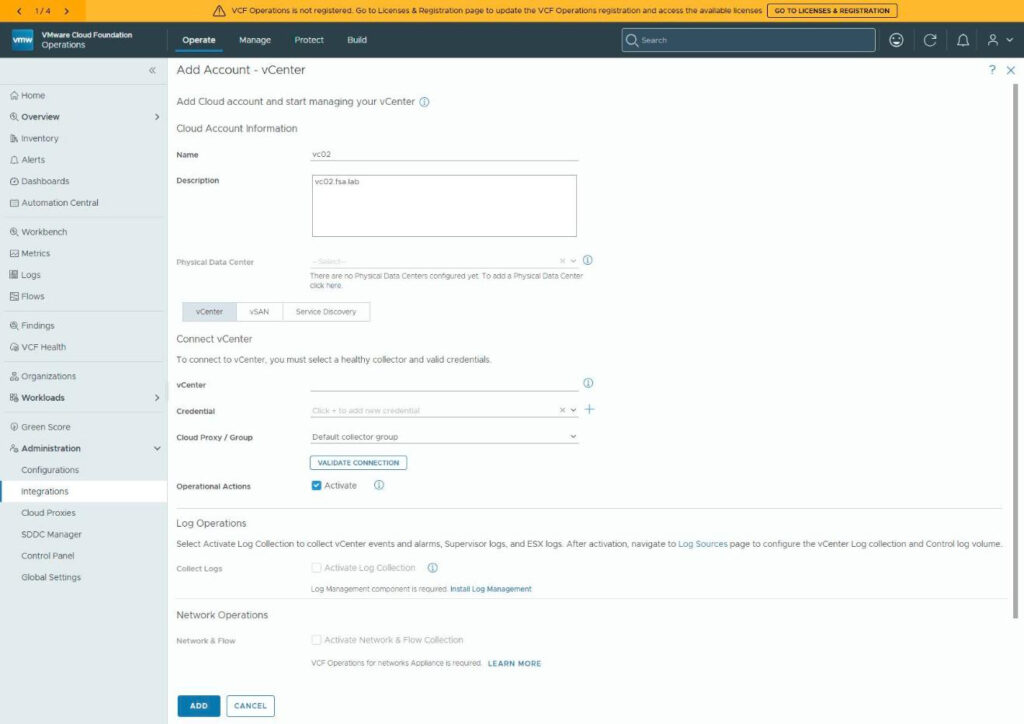
Notice the orange banner that’s now across the top of every page: “VCF Operations is not registered. Go to Licenses & Registration page to update the VCF Operations registration and access the available licenses.”
There’s step three, nagging from the moment the product came up. We’ll resolve it in a minute.
The form is short. Name and Description for the cloud account, then under Connect vCenter the vCenter FQDN, a Credential, and a Cloud Proxy / Group (Default collector group is fine for a single node).
Click the + next to Credential for the Manage Credential dialog.
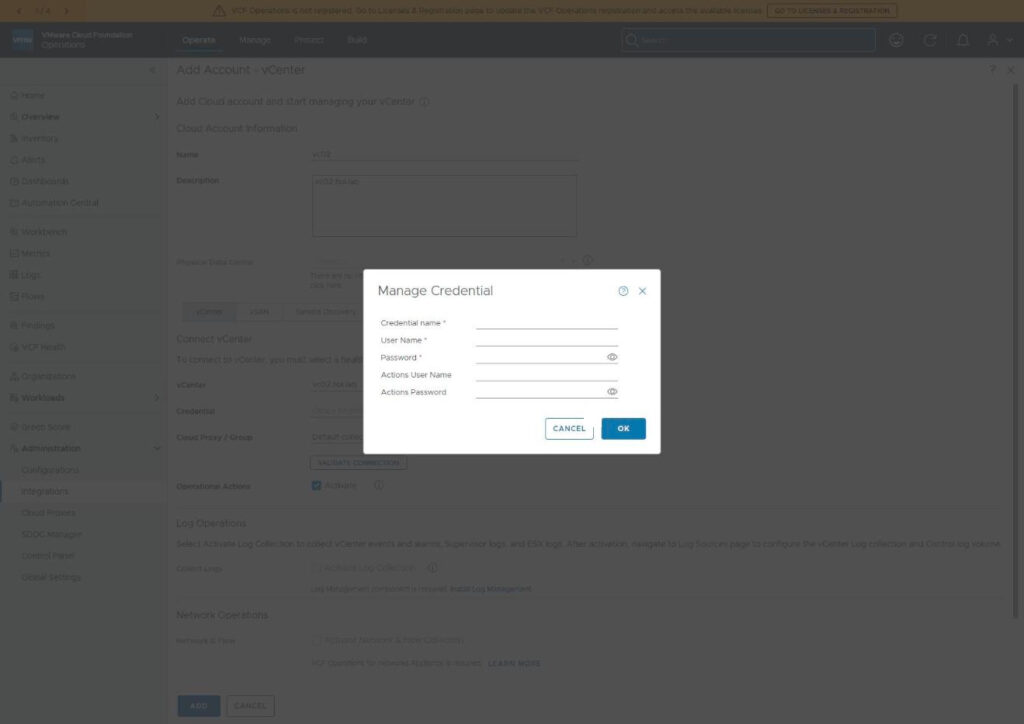
Two things about this dialog.
The Actions User Name and Actions Password at the bottom are optional, and they’re a privilege decision rather than a formality. Fill them in and VCF Operations can act on vCenter (power operations and the like) instead of only reading from it. Leave them blank and you stay read-only. There’s also an Operational Actions: Activate checkbox on the form behind this dialog, checked by default. If you’re pointing this at a system you’re about to upgrade and converge, decide whether you want that on.
On the account itself, least privilege is the right instinct. Collection only needs read. The SSO administrator works, but it ties your collection to the busiest identity in the environment right as you’re about to redeploy vCenter and converge, and if that password rotates mid-project the adapter quietly stops and it won’t be obvious why. A dedicated read-only service account survives all of it.
Hit VALIDATE CONNECTION before you save, then ADD.
Step 11: Start Collecting
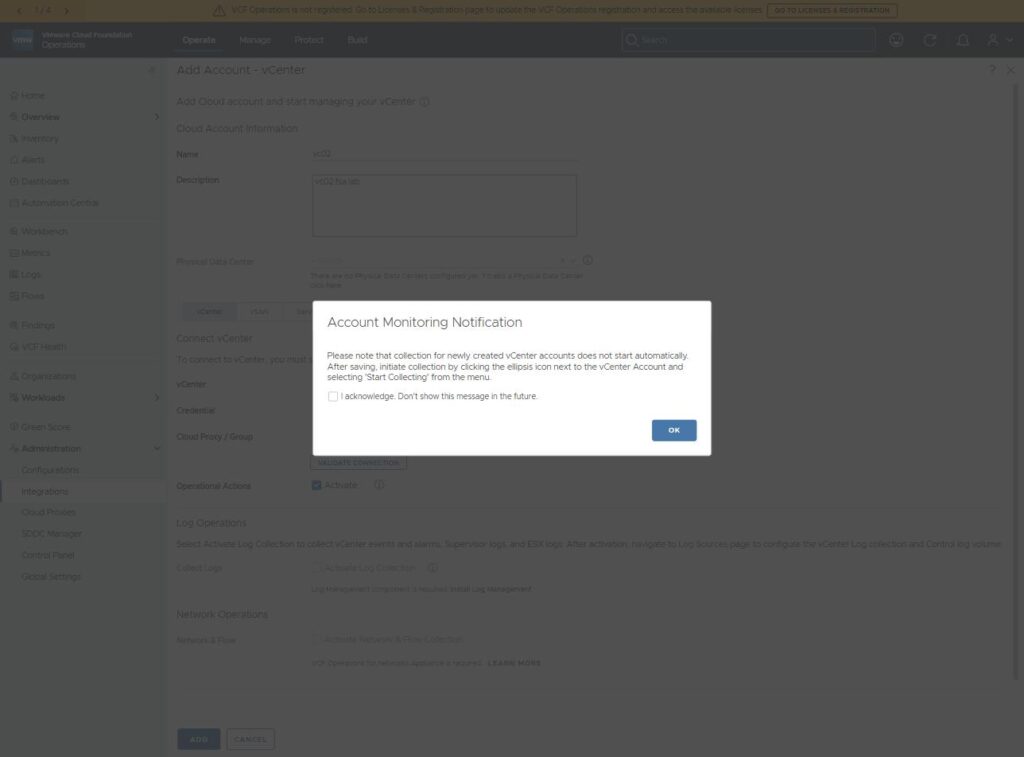
Adding the account doesn’t start collection either, and this time it tells you so in a modal: click the ellipsis next to the account and pick Start Collecting. Credit where it’s due, that’s more warning than the Start Cluster button gave.
So the account lands as Stopped.
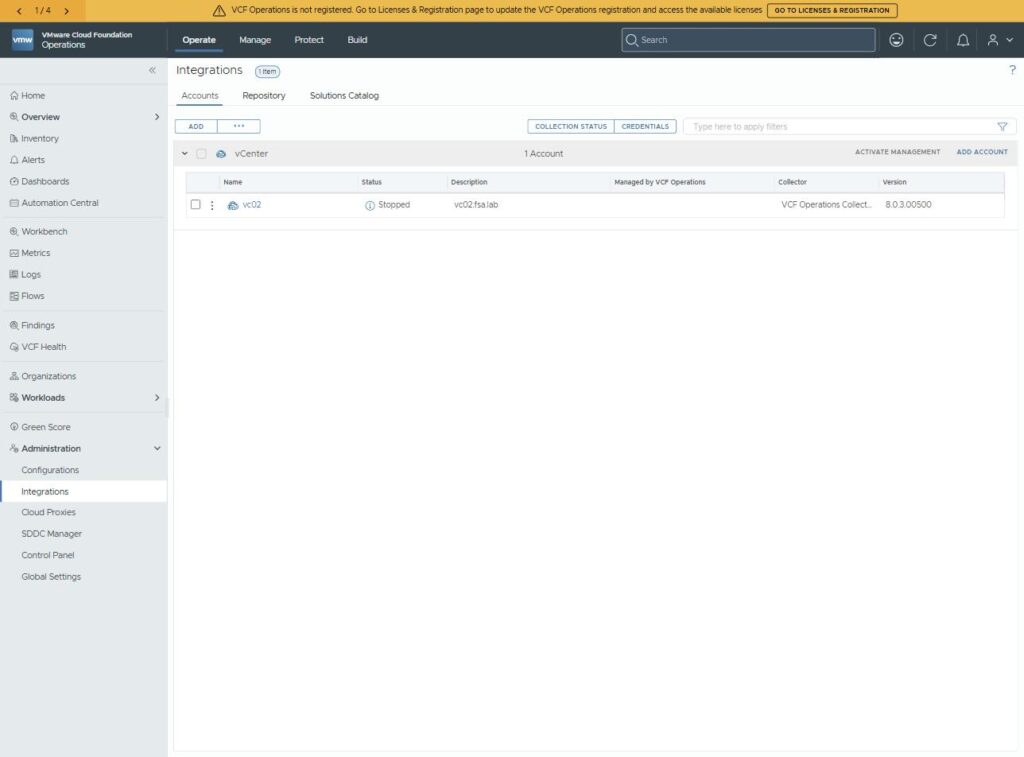
Nice detail in that row though: the Version column already reads 8.0.3.00500. It read vCenter’s build before collecting a single metric, and that’s the 8.0 U3 starting point staring back at me.
Start Collecting puts it into Warning while the first cycle runs. Don’t panic at Warning, give it a cycle. Mine settled to green Collecting inside two minutes.
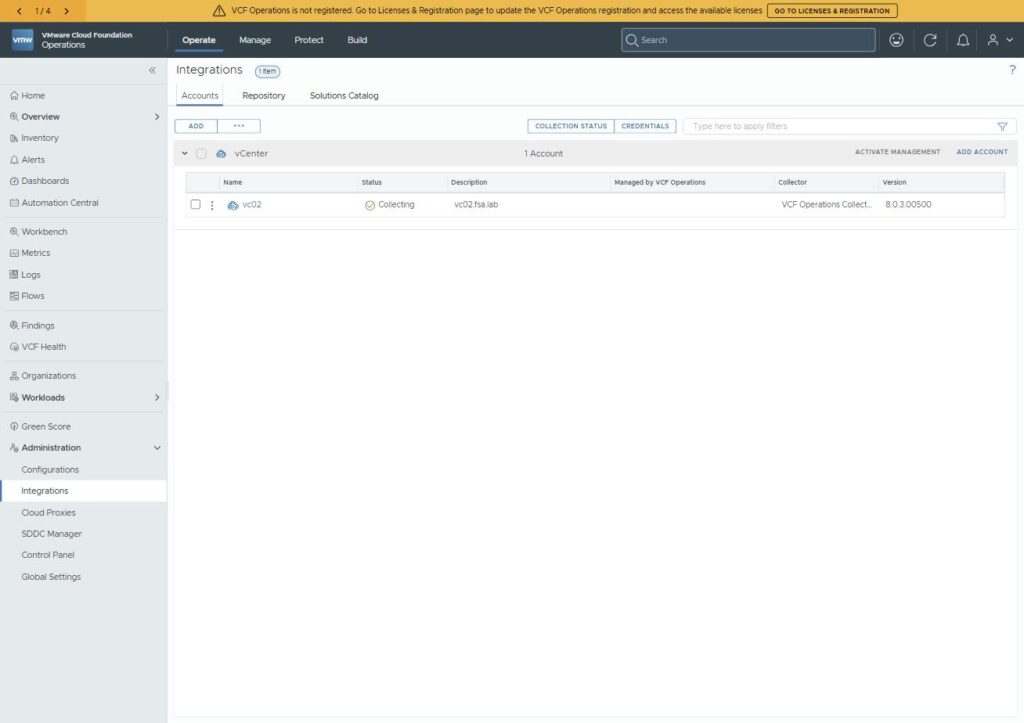
Step 12: Verify It
A green status label is a claim, not proof. Go to Inventory and expand the tree.
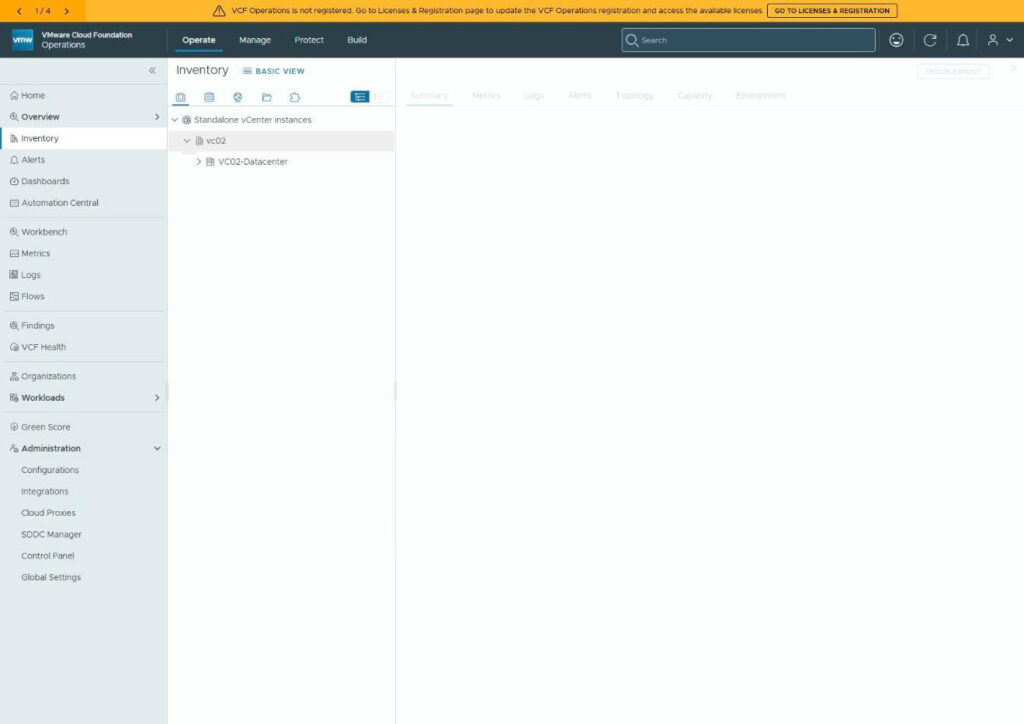
Standalone vCenter instances > vc02 > VC02-Datacenter. Real objects, discovered from the real vCenter. That’s collecting. Give it a few more cycles and hosts, clusters, datastores and VMs fill in underneath.
Worth noting the label VCF Operations picked: Standalone vCenter instances. Accurate description of what I have today, and a quiet preview of what converge changes.
Part Two: The License Server
New in 9.1, mandatory, and a separate appliance from VCF Operations. If you only downloaded one OVA, go back for the other one.
The shape of it: VCF Operations mints a Unique Registration Key, you inject that key as an OVF property when you deploy the License Server appliance, the appliance phones home to VCF Operations with it, and then you register the pair against Broadcom to pull your actual entitlement down.
Step 13: Generate the Registration Key
In VCF Operations, head to the Licenses & Registration page the orange banner has been pointing at and start a registration.
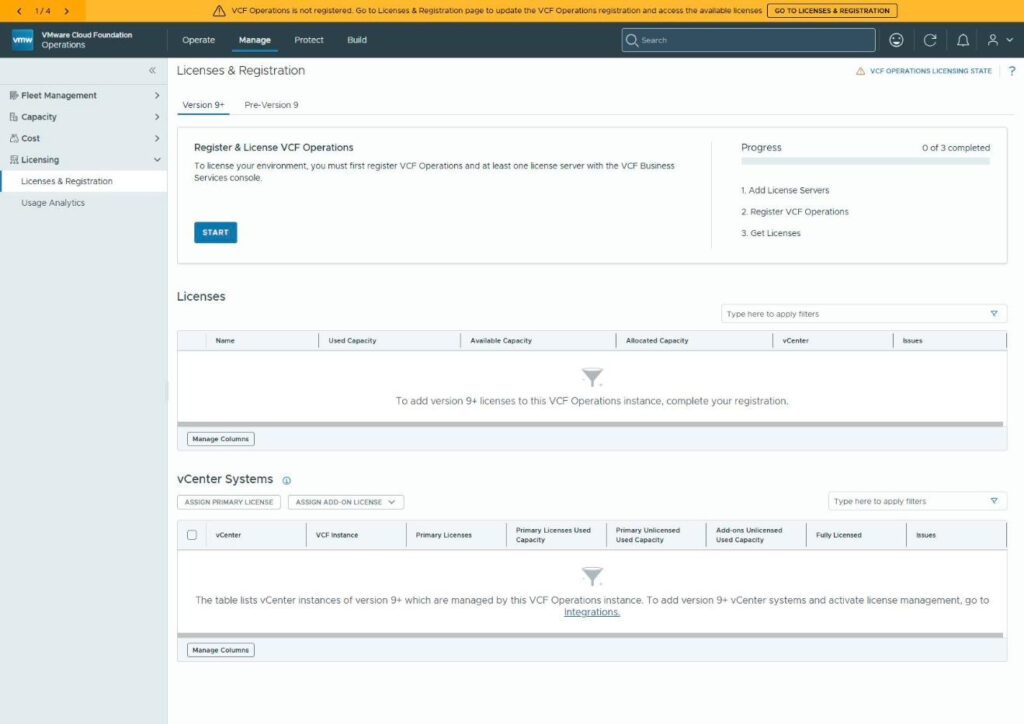
The Add License Server page lays out four steps, and the third one hands you the key.
Note the two little icons to the right of that box: a copy button, and a circular regenerate arrow. Hold that thought.
Step 14: Grab That Key and Use It Immediately
Helm’s Deep didn’t fall to the ladders. It fell at the drain in the Deeping Wall, because that was the one spot nobody thought to watch.
Here’s my drain. The appliance deployed fine. Booted fine. Took its static IP fine. VCF Operations even discovered the VM and reported it green across the board: powered on, no active alerts, over a year of time remaining.
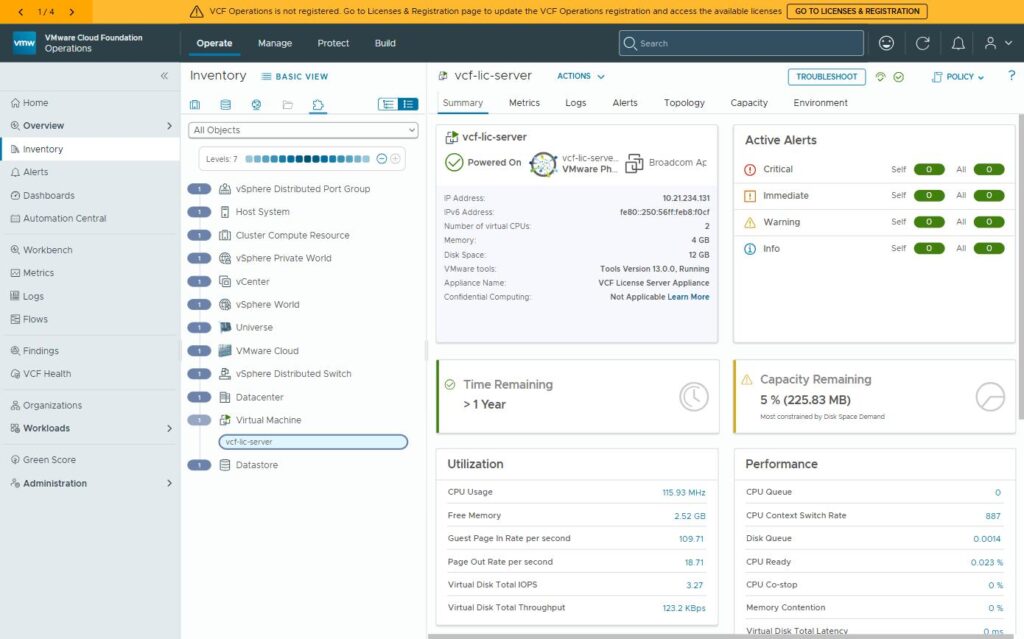
And it never appeared in the License Servers table.
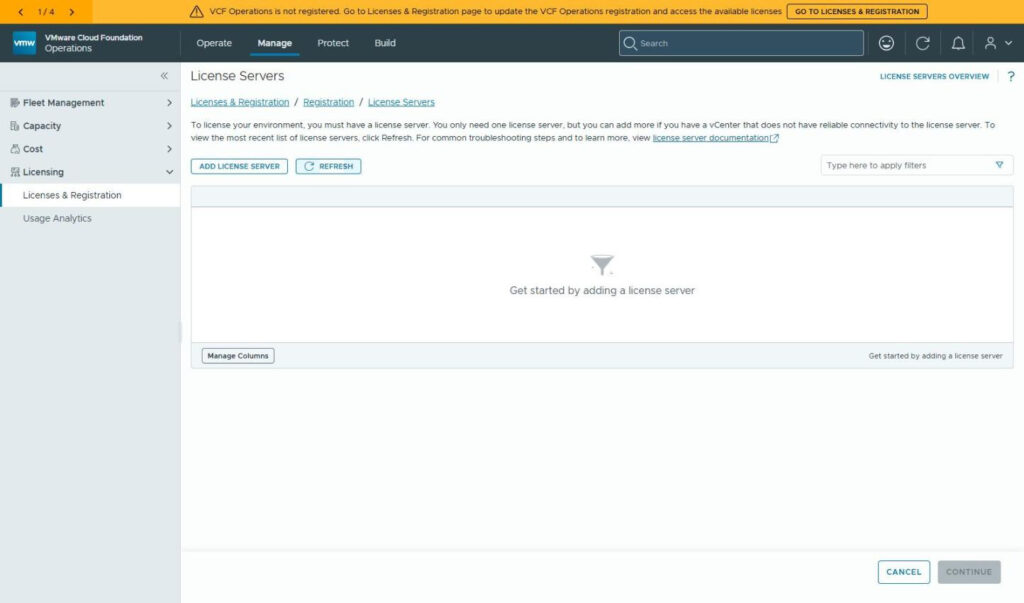
Nothing errored. Nothing told me why. A perfectly healthy appliance that the licensing plane simply would not acknowledge.
Here’s the thing I noticed while poking at it, and it’s the part I’d actually pass along: that key is not a stable value. I ended up reloading the Add License Server page several times over an afternoon, and I got a different key every time, without ever touching the regenerate arrow. Five loads, five different enrollment passphrases.
That tracks with how Broadcom describes the field. The docs call it “an encoded, time-bound key,” and KB 441251 refers to it as a One-Time Token. A one-time, time-bound token being reissued when you ask for it again is the design working as intended, not a bug. It just means the key sitting in your clipboard from twenty minutes ago may not be the key the system is currently expecting.
So my working theory was that I’d deployed with a key that had gone stale between copying it and finishing the OVF wizard. I redeployed, this time pasting a freshly minted key straight into the wizard, and it connected immediately.
But I want to be straight with you: I can’t prove that was the problem. The redeploy changed two things at once, a fresh key and a fresh appliance, so I never isolated the key as the cause. It’s a hypothesis that fit the evidence and a fix that worked, which is not the same thing as a diagnosis.
And if you land here, there’s a better place to start than my theory. KB 441251 describes these exact symptoms (added with no error, appliance never shows up under Licenses & Registration) and lists causes I’d check before anything else:
- Time drift between the VCF Operations VM and the License Server appliance, which prevents token validation. Given the key is time-bound, this is the one I’d look at first, and it’s the one I can’t rule out in my own case because I’d changed NTP servers earlier that same day.
- DNS, specifically forward and reverse records for the VCF Operations FQDN and short name.
- Uppercase characters anywhere in hostnames or DNS records. VCF 9.1 components fail to talk to each other over this one, which is a wonderful thing to discover at 10pm.
- Deploying the OVA from the ESXi host client instead of the vSphere Client, which skips vApp property injection entirely.
- Proxy settings configured when internal traffic doesn’t need them.
Work that list. It’s the documented path and it’s more likely to find your actual problem than my guess about mine.
What I’ll stand behind regardless of which of us is right: copy the key and go straight into the OVF wizard with it. Don’t reload the page, don’t wander off to find the OVA, don’t let the tab close behind you. Broadcom’s own procedure says to copy and save the key at that step for a reason, it costs you nothing to treat it as perishable, and it removes one variable from a problem that gives you no error message to work with.
Step 15: Connected, Not Registered
With a current key, the appliance shows up, and it shows up in a halfway state.
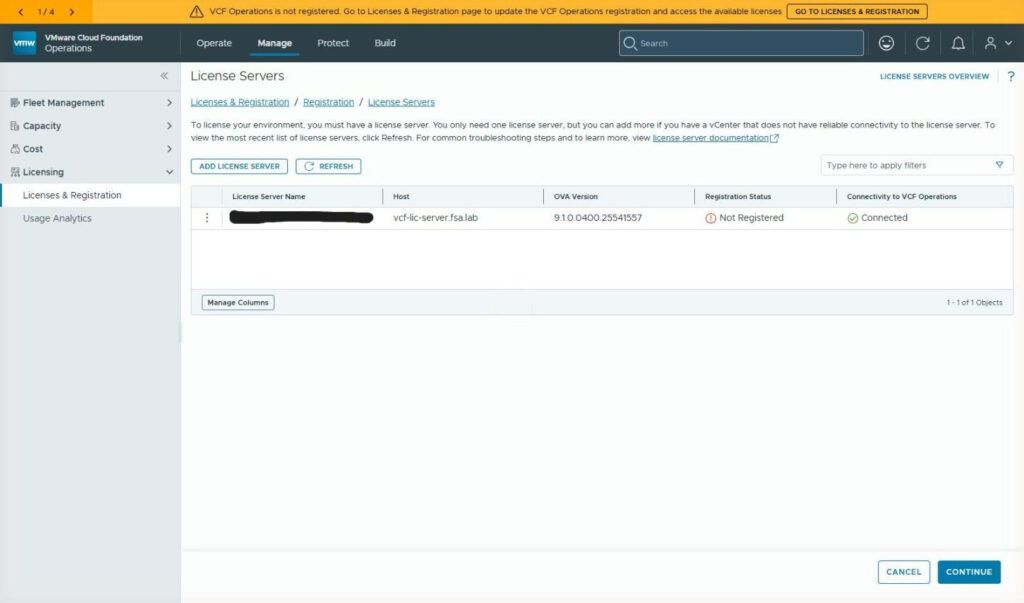
Connected means it found VCF Operations and the key checked out. Not Registered means it hasn’t been associated with your Broadcom entitlement yet, so it has no licenses to hand out. Two separate things, and only the first one is done.
Step 16: Connected vs Disconnected Mode
This is the screen where one radio button changes the entire shape of the job, and it’s worth knowing before you pick.
Disconnected mode is an eight-step workflow built around four file handoffs against the Broadcom Support console. Registration file out, verification file back, confirmation file out, license file back. It works, and it’s the right answer if the appliance truly has no path to Broadcom.
Connected mode collapses that to a two-step activation code exchange.
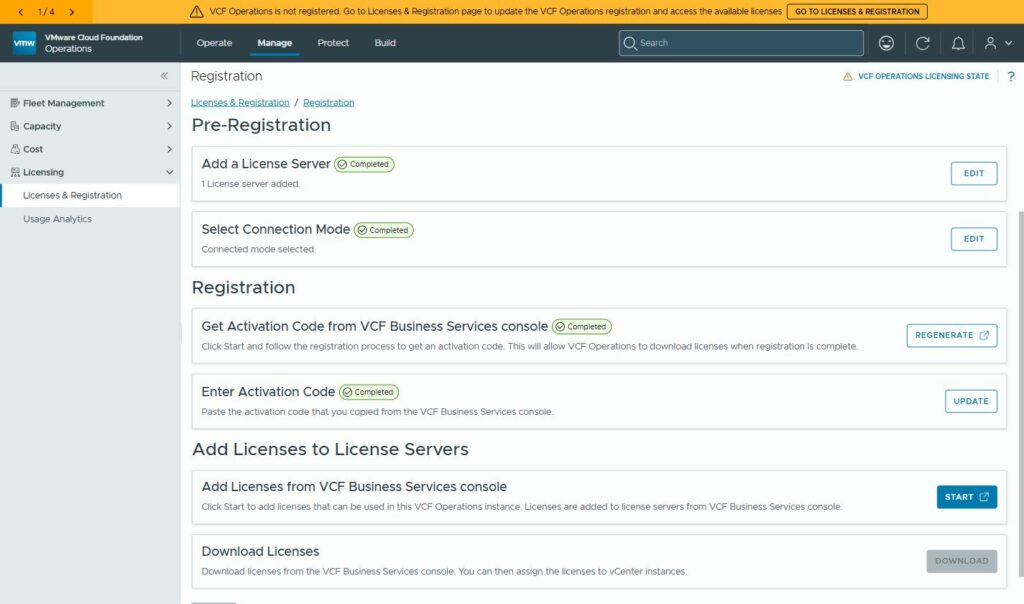
Same page, same workflow name, wildly different afternoon. If your appliance has egress, take Connected.
Step 17: Pull the Licenses Down
Once registered, the entitlement downloads from your Broadcom account.
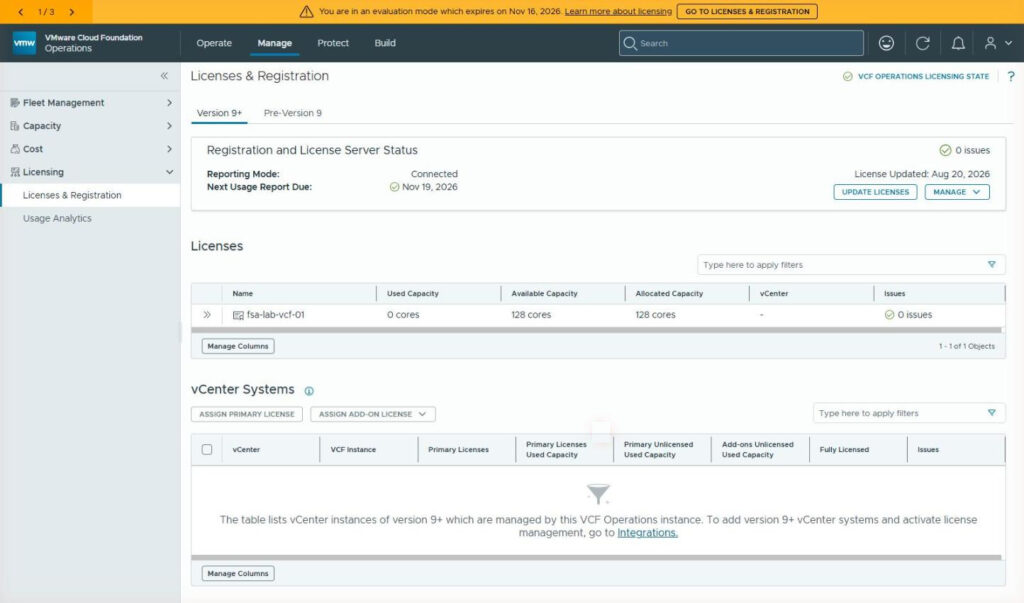
128 cores of VCF, sitting in the License Server, ready to be assigned.
And now the part the guides skip: you can’t assign any of it yet.
The vCenter Systems table in License Management only lists 9.x and later instances, and vCenter is still on 8.0 U3e. So there’s nothing to assign capacity to, and the evaluation warning you may be looking at is not a mistake you made. It’s expected, and it’s expected to stay there until vCenter is on 9.1.
That’s a real gotcha if you’re working a checklist that says “verify no evaluation warnings” at the end of this phase. You can’t satisfy it here. It clears in the next post, after the vCenter upgrade, when vc02 finally appears in that table and takes its 64 cores.
Wrap Up
That’s steps two and three of seven. The licensing control plane exists, VCF Operations is collecting from vCenter, the License Server is registered with the entitlement pulled down, and nothing in vSphere has been touched or taken offline to get there.
Two things I’d carry out of this if you’re walking a similar route.
Follow the dependency, not the instinct. vCenter feels like the main event, so it feels like it should go first. In 9.x it draws its entitlement from something that has to exist beforehand. VCF Operations, then License Server, then vCenter.
Treat the registration key as perishable. The License Server is where I lost real time, because the appliance looked perfectly healthy while being completely useless to the licensing plane. I never did prove the key was my root cause, so don’t take my theory as gospel, but copying it and pasting it straight into the OVF wizard costs you nothing and removes a variable from a problem that hands you no error message. If it still won’t register, KB 441251 is a better checklist than anything I worked out on my own: time sync first, then DNS, then lowercase everything.
Next up is the vCenter and ESX upgrades: the temp IP, a pleasant surprise in the depot, a vendor addon that VALIDATE caught before it could ruin an evening, and vc02 finally showing up to collect its 64 cores.
The marching hasn’t stopped. It was never going to. But the wall’s a little higher than it was this morning.
Like everything in this space, some of these menus will have moved by the time you read this and the version numbers will have rolled. Doing the same upgrade and your route forked somewhere mine didn’t? Find me on LinkedIn and let’s compare notes, I’d love to hear where yours went.
References:
- Upgrading vSphere 8 and Optionally vSAN and Aria Operations 8 to 9.1
- Upgrade Sequence and Related Issues for VCF and vSphere Foundation 9.1 (KB 440630)
- Deploy VCF Operations as Part of a VCF 9.1 Upgrade
- Deploy a License Server Version 9.1.0
- Adding License Server in VCF Operations redirects back to License & Registration page (KB 441251)
- Deploying the License Server in vSphere Foundation 9.1
- Converging Existing Virtual Infrastructure to a VCF or vSphere Foundation Platform