
In Jurassic Park, InGen didn’t build a new dinosaur from scratch. They found a mosquito trapped in amber, pulled one good strand of DNA, and cloned from that source. That amber-preserved DNA sample is what we will make today.
That’s exactly what a golden image is in OpenShift Virtualization. You build Windows Server once, preserve it in amber (a boot source), and every future VM clones from it. The best part of this, is that PX-CSI with FlashArray block volumes use FA purevol copy feature, which makes the template creation supa fast. Give yourself a minute here, because Windows on a Red Hat platform means Tux the penguin and Clippy are stuck sharing an elevator, and neither one knows what to say. But after you recover, let’s walk through how I got Windows Server 2022 and 2025 cloning like it’s InGen.
Templates in OpenShift Virt – What’s Out of the Box?
If you deploy OpenShift Virtualization and open the template catalog, the Windows templates are already there (all 24 flavors of them, 2016 through 2025, desktop and server). You’d think you could just click “Windows Server 2022” and go.
You can’t. Not yet.
Red Hat auto-downloads the Linux images for you through a thing called a DataImportCron, but they don’t ship you a Windows ISO. Microsoft would have some words. So the template exists, the shelf is built, but you have to supply the actual jar of dinosaur DNA yourself.
Build the boot source and the stock template lights up for every user in every project automatically.
What You’ll Need
- An OpenShift cluster running OpenShift Virtualization (I’m on 4.21, CNV 4.21.13).
ocandvirtctl(I run mine from a jump host,virtctllives in~/bin).- Your Windows Server installer ISO (grab it from your volume licensing portal).
- The virtio-win ISO from fedorapeople. Grab the
.iso, not the MSIs or the tarball. This is the box of drivers that lets Windows even see a paravirtualized disk.
Step 1: Get the ISOs Into the Cluster
Windows can’t install from an ISO that’s sitting on your laptop, it needs to live in the cluster as a PVC. virtctl image-upload handles that: it creates a DataVolume, spins up a temporary upload pod, and streams your file straight in.
First, a scratch project to keep things tidy:
oc new-project vm-images
Now the upload. I’ll start with the tiny virtio ISO:
virtctl image-upload dv virtio-win-iso \
  --namespace=vm-images --size=1Gi \
  --image-path=$HOME/windowsimages/virtio-win-0.1.285.iso \
  --storage-class=sn1-x90r2-f05-33-fsa-lab \
  --uploadproxy-url=https://cdi-uploadproxy-openshift-cnv.apps.ocp-fsa-lab.fsa.lab \
  --force-bind --insecure
Then the real payloads (same command, bigger files, bump the size for headroom):
virtctl image-upload dv win2k22-installer-iso \
  --namespace=vm-images --size=10Gi \
  --image-path=$HOME/windowsimages/windows_server_2022.iso \
  --storage-class=sn1-x90r2-f05-33-fsa-lab \
  --uploadproxy-url=https://cdi-uploadproxy-openshift-cnv.apps.ocp-fsa-lab.fsa.lab \
  --force-bind --insecure
Verify everything landed:
oc get dv,pvc -n vm-images
All DataVolumes Succeeded, all PVCs Bound. We’re ready to collect some DNA.
Step 2: Build the Extraction Chamber (the Build VM)
This VM is throwaway scaffolding. It exists only long enough to install Windows, and then we harvest its disk. I built mine straight from YAML so it’s repeatable:
cat <<'EOF' | oc apply -f -
apiVersion: kubevirt.io/v1
kind: VirtualMachine
metadata:
  name: win2k22-golden-build
  namespace: vm-images
spec:
  runStrategy: Manual        # important so that the VM actually shuts down, "always" will drive you mad
  template:
    spec:
      domain:
        cpu: { sockets: 1, cores: 2, threads: 1 }
        memory: { guest: 4Gi }
        machine: { type: q35 }
        firmware:                 # MUST match the template, more later
          bootloader:
            efi:
              secureBoot: true
        features:
          smm: { enabled: true }  # required when secureBoot is on
        devices:
          tpm: {}                 # the template gives each VM a vTPM
          disks:
          - name: rootdisk
            disk: { bus: virtio }
            bootOrder: 2
          - name: installcdrom
            cdrom: { bus: sata }
            bootOrder: 1
          - name: virtiocdrom    # drivers you will need
            cdrom: { bus: sata }
          interfaces:
          - name: default
            model: e1000e
            masquerade: {}
      networks:
      - name: default
        pod: {}
      volumes:
      - name: rootdisk
        dataVolume: { name: win2k22-golden-build-rootdisk }
      - name: installcdrom
        persistentVolumeClaim: { claimName: win2k22-installer-iso }
      - name: virtiocdrom
        persistentVolumeClaim: { claimName: virtio-win-iso }
  dataVolumeTemplates:
  - metadata:
      name: win2k22-golden-build-rootdisk
    spec:
      source: { blank: {} }
      storage:
        accessModes: [ReadWriteMany]
        volumeMode: Block
        resources:
          requests: { storage: 60Gi }
        storageClassName: sn1-x90r2-f05-33-fsa-lab
EOF
A few things to note. The blank 60GB disk on the virtio bus is the future golden master. Both ISOs mount as sata CD-ROMs, with the Windows installer set to boot first. And the NIC is e1000e (not virtio) so Windows has working networking the second it boots, before we’ve installed a single driver. If you have a network heavy VM, you would likely want to swap to a virtio-net vNIC for better throughput and lower latency. And lastly, this is a modern boot using UEFI with all the modern features of vTPM and SecureBoot.
Step 3: Install Windows (and Feed It the Driver)
Start the VM, open the Console tab, and mash a key when it says “Press any key to boot from CD.”
You’ll click along happily until you hit “Where do you want to install Windows?” and the disk list is completely empty. This is the moment the virtio ISO comes in.
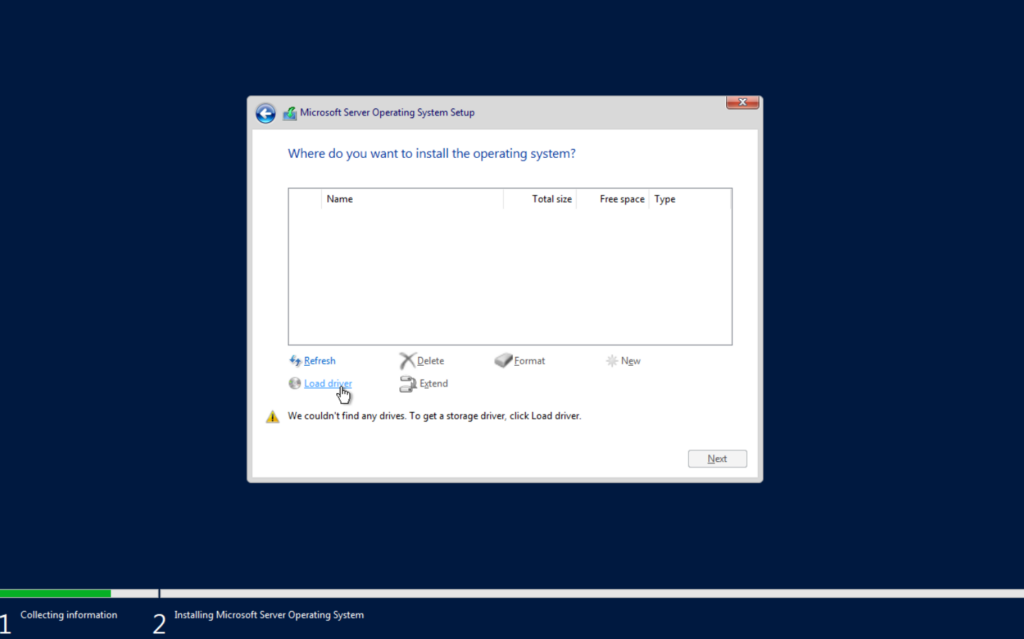
“We couldn’t find any drives.” That’s not a broken VM, that’s Windows not knowing what a virtio disk is yet.
Click Load driver, browse to the virtio CD, and drill into viostor\2k22\amd64 (swap in 2k25 for Server 2025):
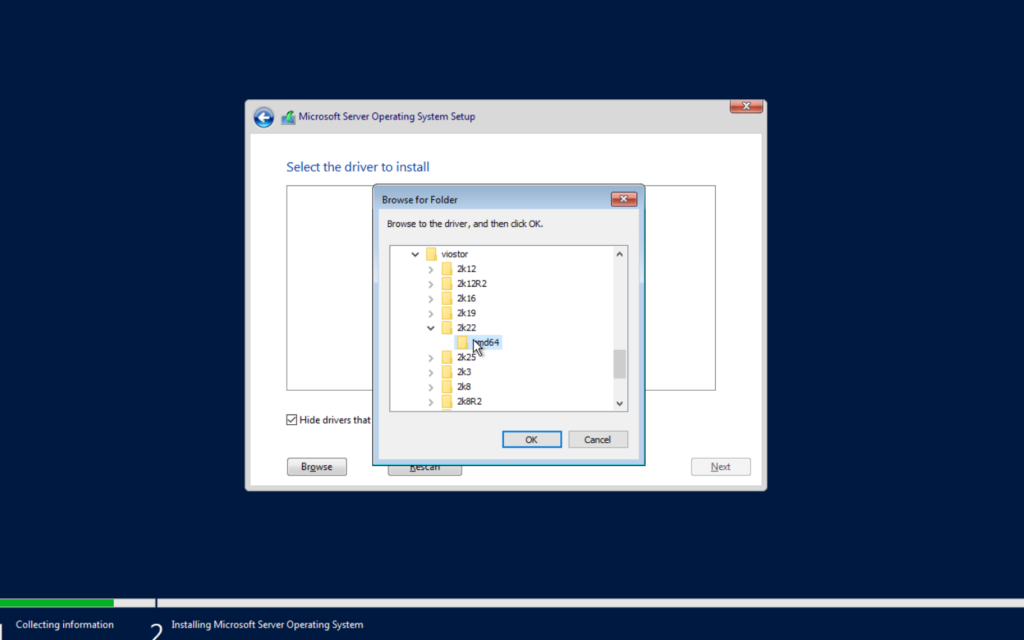
Pick the folder matching your Windows version. The amd64 underneath it is the actual driver.
Hit Next and your 60GB disk appears. Select it and let the install run.
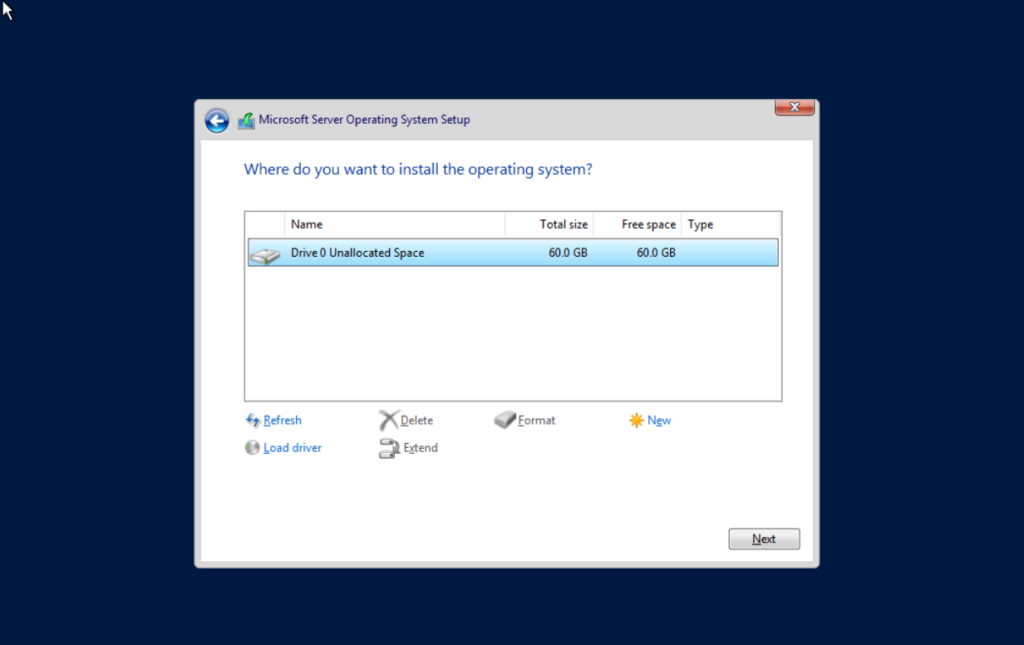
Driver loaded, and there’s our golden disk waiting to be filled.
Tip: Use paste-to-console. Typing a long password or product key character by character over VNC is its own special kind of misery. The console has a paste button, use it.
Step 4: Cloning Prep (Guest Tools + Sysprep)
When Windows lands on the OOBE “Hi there” screen, don’t fill it out. Hit Ctrl+Shift+F3 instead. That drops you into Audit Mode, which logs you in as the built-in Administrator and, crucially, doesn’t bake a junk user account into your template. This is Microsoft’s actual intended way to build an image, it’s just buried where nobody looks.
Cancel the sysprep box that pops up (we’ll run it ourselves in a second), open the virtio CD, and run virtio-win-guest-tools.exe. This installs the rest of the VirtIO drivers plus the QEMU Guest Agent in one shot. That guest agent is what lets OpenShift report the VM’s IP and hostname and shut it down gracefully, so don’t skip it.
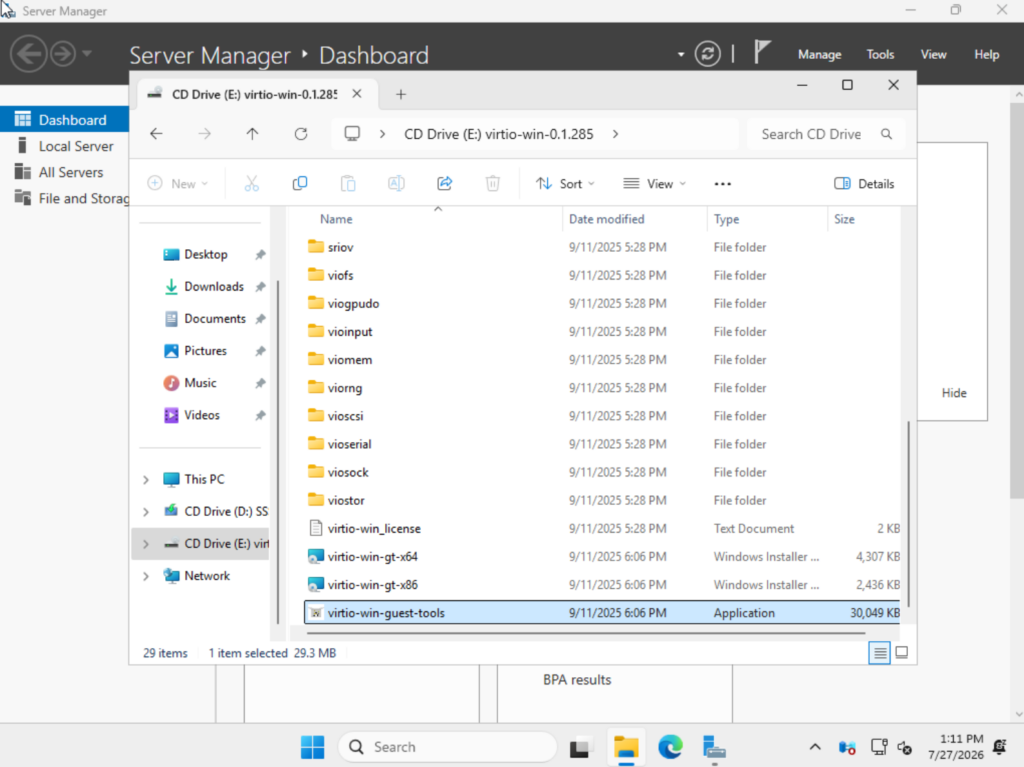
Running virtio-win-guest-tools.exe straight off the mounted virtio CD. One installer, all the drivers plus the guest agent.
Now the actual cloning magic. Sysprep with the /generalize flag strips out every machine-specific fingerprint (the SID, the computer name, the activation state), so every clone comes out unique instead of a room full of identical twins that confuse Active Directory. From an elevated command prompt:
C:\Windows\System32\Sysprep\sysprep.exe /generalize /oobe /shutdown
Don’t forget that “Past to console”, works like a charm.
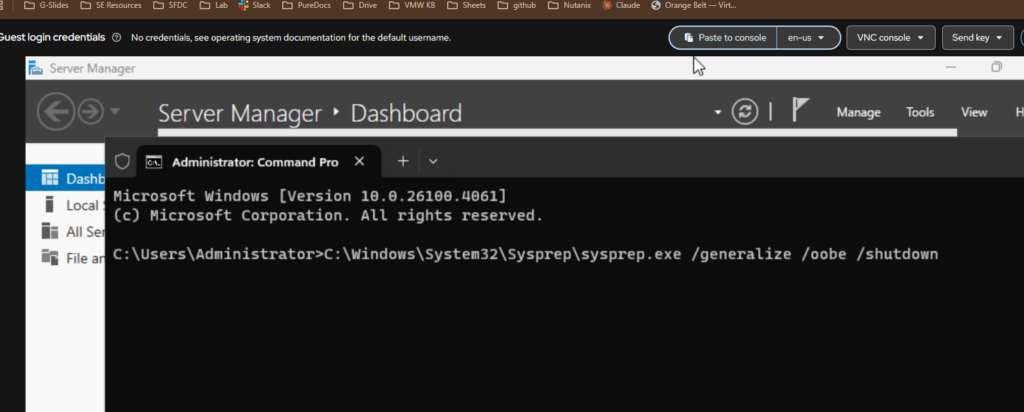
If you use the GUI dialog instead, the one box people forget is Generalize. It’s unchecked by default and the entire template depends on it. Check it.
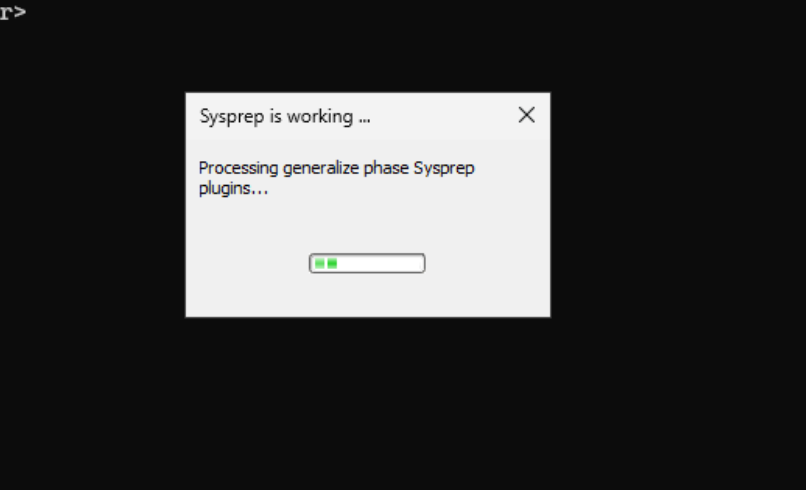
Sysprep chewing through the generalize phase. When it finishes, the VM powers off and you do not touch it again.
Don’t Be Me: The Reboot That Wouldn’t Die
In my first go around making the templates, i didn’t specify the runStrategy as “Manual” and it was set to “Always”
The fix is one line, switching the run strategy to Manual so a shutdown actually sticks:
oc patch vm win2k22-golden-build -n vm-images --type=json \
  -p='[{"op":"remove","path":"/spec/running"},{"op":"add","path":"/spec/runStrategy","value":"Manual"}]'
(You have to remove running and add runStrategy in the same atomic patch, because KubeVirt won’t let you have both.) After that, Ctrl+Shift+F3 back into Audit Mode, re-run sysprep, and this time it powers off and stays off. Notice I put runStrategy: Manual right in the VM YAML back in Step 2, that’s me saving future-you the headache.
Step 5: Preserve It In Amber (Promote to a Boot Source)
Confirm the VM is Stopped. Remember how the win2k22 boot source was already sitting there pointed at a PVC that didn’t exist? We just have to create that PVC by cloning our golden disk into it. We don’t touch the boot source definition at all (it’s managed by the SSP operator, and it already knows what it wants):
cat <<'EOF' | oc apply -f -
apiVersion: cdi.kubevirt.io/v1beta1
kind: DataVolume
metadata:
  name: win2k22
  namespace: openshift-virtualization-os-images
  annotations:
    cdi.kubevirt.io/storage.bind.immediate.requested: "true"
spec:
  source:
    pvc:
      namespace: vm-images
      name: win2k22-golden-build-rootdisk
  storage:
    accessModes: [ReadWriteMany]
    volumeMode: Block
    resources:
      requests: { storage: 60Gi }
    storageClassName: sn1-x90r2-f05-33-fsa-lab
EOF
Wait for the clone to finish, then check the boot source:
oc get datasource win2k22 -n openshift-virtualization-os-images \
  -o custom-columns="NAME:.metadata.name,READY:.status.conditions[?(@.type=='Ready')].status"
NAME      READY
win2k22   True
Boot Source or Custom Template? (Pick Your Weapon)
While we’re here, a question I chewed on: should you promote a boot source like we just did, or use the console’s “Save as Template” button? They sound the same but they are different. Here is a breakdown from claude (AI makes mistakes so def double check.)
| Boot Source (what we did) | Custom Template | |
|---|---|---|
| What it is | A generalized disk the stock templates clone from | A whole VM config (CPU, RAM, disks) saved as a new catalog tile |
| Visibility | Cluster-wide, every project | Only the project you saved it in (unless you move it to openshift) |
| Best for | “I just want Windows available everywhere” | “I need a very specific canned config” |
| Winner | This one, 9 times out of 10 | The niche snowflake case |
Wrap It Up!
The best part is the whole thing is repeatable. Server 2025 was a copy-paste job with the version numbers swapped. Extract the DNA once, clone forever.
See something you’d do differently, or hit a gotcha I didn’t? Find me on LinkedIn and let’s talk, I’d love to hear how you’re running Windows on OpenShift!