Intro
I’d like to address the rumor—which I apparently started myself—that I am the official RDM evangelist.
That couldn’t be further from the truth. In that same spirit, I thought this was a great opportunity to show how I’ve helped customers migrate off of RDMs.
This particular customer wanted to move away from RDMs as part of a new database architecture they were planning. The timing was perfect to leverage the pRDM-to-vRDM-to-Storage-vMotion workflow I’ve used in the past. Since most of the existing content on this topic is outdated, I thought it was a good time to post a “how-to” guide. The steps I will be following are directly from this Broadcom KB article, so feel free to check out the official documentation for other ways to accomplish this.
Part 1: Convert pRDM to vRDM (Requires Some Downtime)
First, we’ll change the Raw Device Mapping from Physical to Virtual compatibility mode. This process is fast but requires you to stop the VM’s application briefly.
- Prepare the VM:
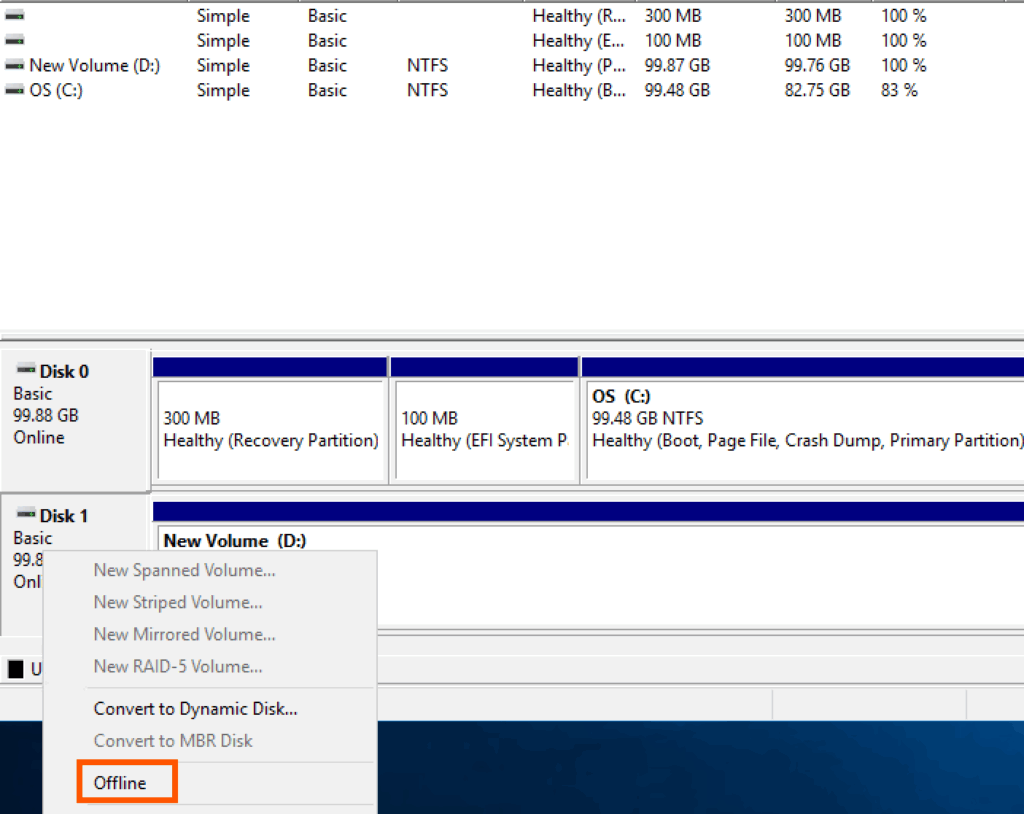
- Shut down the services or applications using the RDM on the virtual machine, additionally, offline the disk that maps to the Raw Device Mapping. This is your planned downtime window.
- In vCenter, navigate to the VM and select Edit Settings.
- Remove the pRDM Pointer:
- In the VM settings, find the RDM hard disk you want to convert.
- Click the 3 dots icon next to the disk and choose Remove device and data
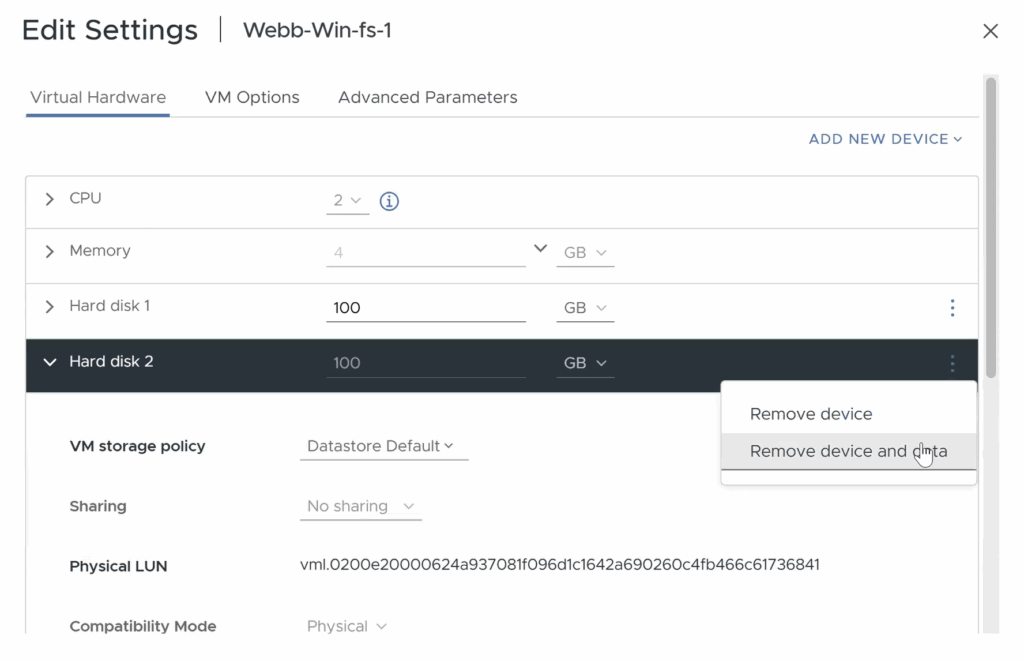
- Important Note: This action only removes the mapping file (the pointer) from the VM. It does not delete any data on the underlying LUN.
- Click OK to save the changes.
- Re-add the Disk as a vRDM:
- Go back into the VM’s Edit Settings.
- Click Add New Device and select RDM Disk.
- Choose the exact same LUN that you just removed.
- In the disk settings, change the Compatibility Mode from Physical to Virtual.
- Assign it to the correct SCSI controller and click OK.
- Verify and End Downtime:
- Inside the guest OS (e.g., Windows Disk Management), bring the disk back Online.
- Confirm that all data is accessible and start your application services.
- Your downtime window is now complete!
Part 2: Migrate vRDM to VMDK (No Downtime)
Now that the disk is a vRDM, you can use a standard Storage vMotion to convert it into a VMDK file without any downtime.
- Start the Migration:
- Right-click the VM and select Migrate.
- Choose Change storage only and click Next.
- Configure the Conversion:
- Select the destination datastore for your new VMDK.
- In the “Select virtual disk format” column, choose your desired format, such as Thick Provision Lazy Zeroed or Thin Provision.

- This is the key step! By selecting a specific format instead of “Same format as source,” you are telling vCenter to convert the RDM into a VMDK during the migration.
- Finish and Verify:
- Review your selections on the final screen and click Finish.
- Once the Storage vMotion task is complete, go back to the VM’s Edit Settings.
- You will now see that the disk type is “Hard Disk” and its file path ends in
.vmdk, confirming the conversion was successful.