From vVols to RDMs: A Strategic Migration Guide
The announcement of vVol deprecation in VCF 9.0 had sysadmins everywhere checking their calendars to make sure it wasn’t April 1st. Nope, it’s just another Tuesday in IT, where ‘stable’ is a four-letter word and your five-year plan now has a shelf life of about five minutes. As customers evaluate their VCF migration readiness, many find themselves planning how to move off vVols. The good news is that over 90% of your workloads will be a simple Storage vMotion. However, some workloads require a bit more planning.
As I discussed in a previous post, some workloads are prime candidates for RDMs. So, how do you migrate these specific workloads and convert their data disks to RDMs? Here’s one effective method.
**Revision 5/11/26: There are two ways to accomplish this. The as written form does transfer all disks in the VM which may consist of large VMDK’s that could take a long time. Leading to big differences if the application is not stop from the clone time. See the revision at the bottom of this blog for an alternative method.
Step 1: Clone the Data Disks
First, you’ll clone the vVol objects that will become the RDMs for your virtual machine. This is a crucial step because once you migrate the VM off the vVol datastore, the original volumes are marked for deletion. Cloning the data disk first prevents accidental data loss.
- Identify the volume ID of the data disk you want to convert to an RDM. You can find this in the vSphere Client by navigating to the VM -> Configure -> Pure Storage -> Virtual Volumes.

- Note the volume name and log in to the Pure Storage Purity UI. Use the volume name to search for and identify the disk.
- Once you’ve located the volume, click the menu (the three vertical dots) and select Copy.
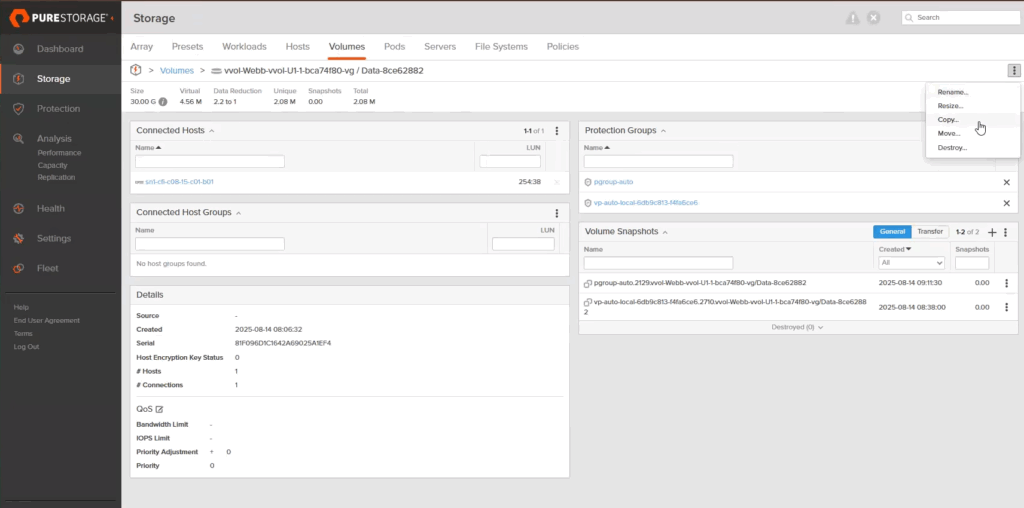
- Give the new volume a descriptive name (e.g.,
vvol-rdm-migration-test-u1). This will be your RDM volume. - After the copy is complete, navigate to the new volume and ensure it is mapped to the vSphere hosts or host group where the VM will reside.
Step 2: Migrate the Virtual Machine
Next, you’ll perform a Storage vMotion to move the VM off the vVol datastore. We’ll use a VMFS datastore in this example, but you could also use an NFS datastore.
- In vCenter, locate your virtual machine.
- Right-click the VM and select Migrate.
- Choose Change storage only and click Next.
- Select your destination VMFS or NFS datastore and complete the wizard. The original data disk (which you’ve already cloned) will be moved along with the VM’s other files.
Step 3: Attach the Cloned Volume as an RDM
In this final step, you’ll attach the cloned volume to the virtual machine as a Raw Device Mapping. Depending on your application’s needs, you might first detach and delete the original VMDK that was migrated from the vVol datastore.
- Edit the settings of your virtual machine.
- Click Add New Device and select RDM Disk.
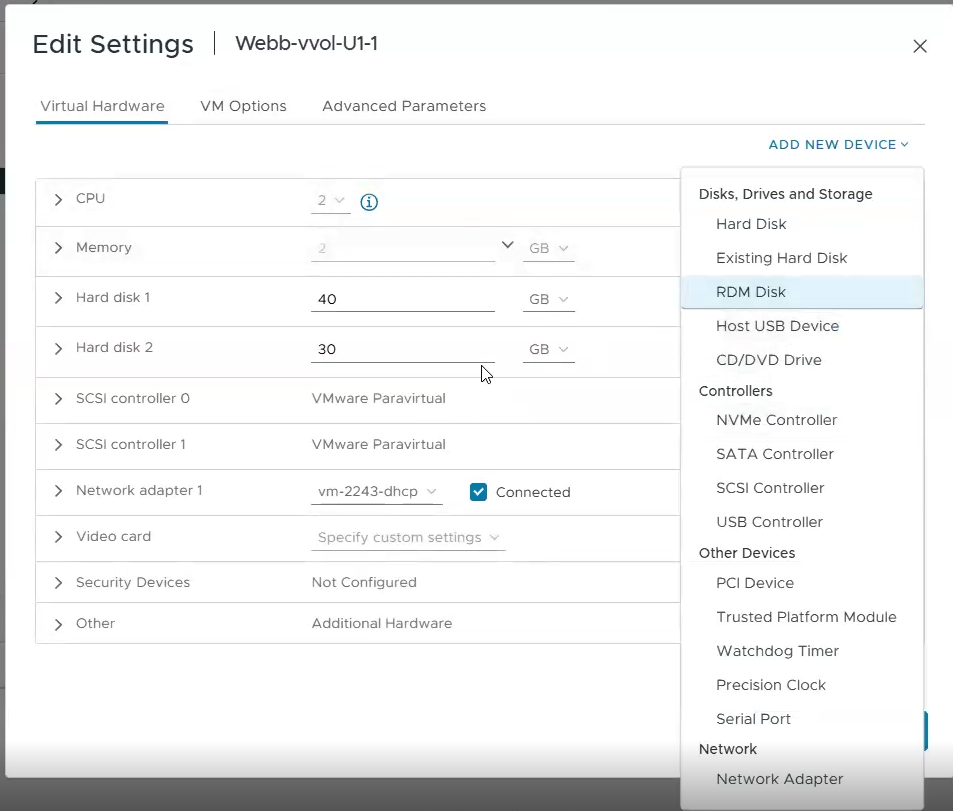
- You’ll see a list of available LUNs. To easily identify the cloned volume, copy its serial number from the Purity UI and use your browser’s find function (Ctrl+F or Cmd+F) in the vCenter UI.
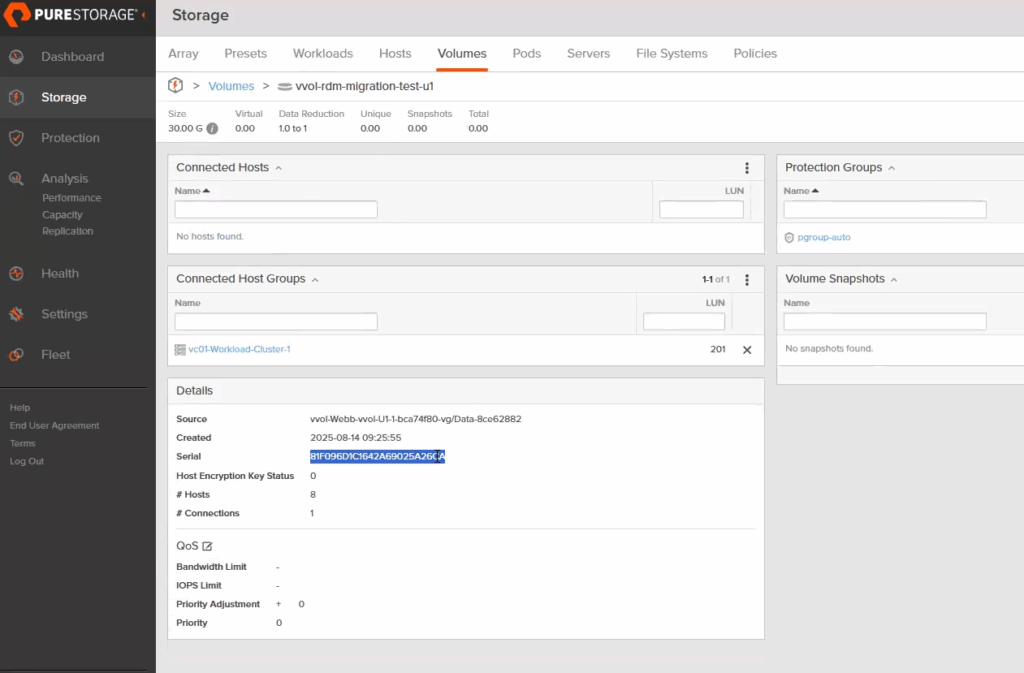
- Select the correct LUN and complete the wizard.
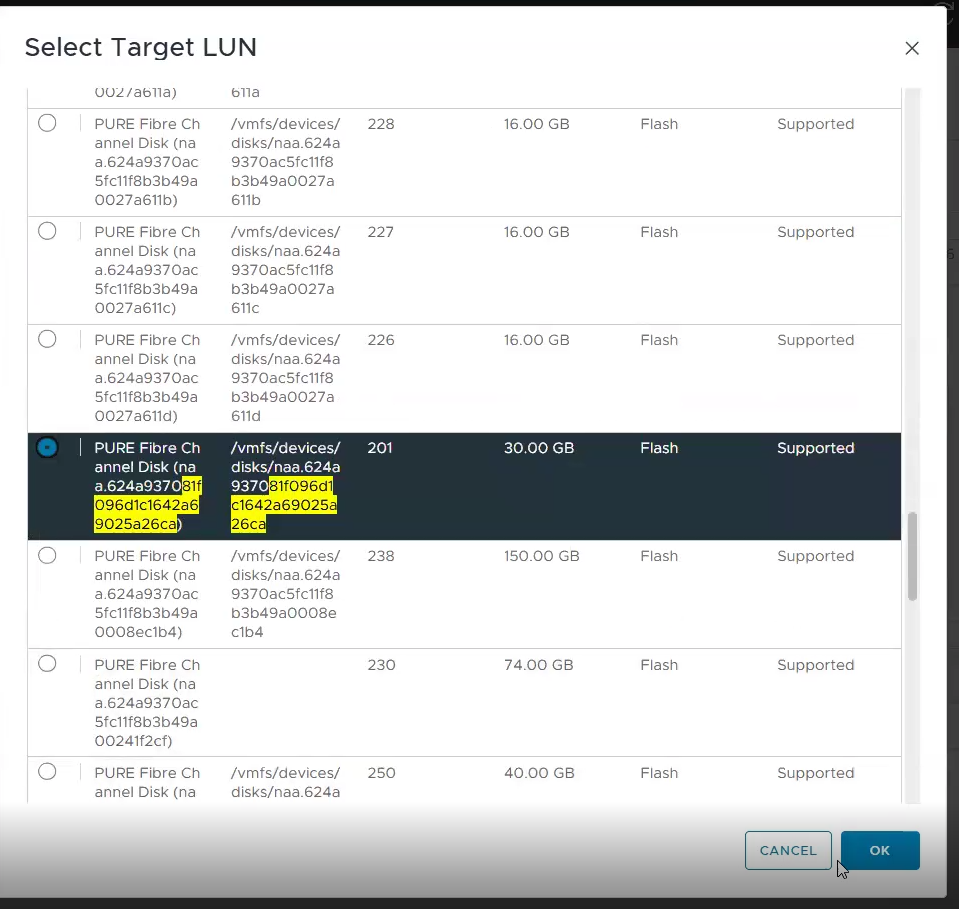
- Save your VM settings and now power on the VM and mount the newly attached RDM within the guest operating system.
Revision: Skip the Data Transfer for Large Data Disks (added 05-11-2026)
If the data disk you’re converting is large (multiple TBs of warm data, a busy SQL volume, etc.), letting Storage vMotion copy it to VMFS just to throw the resulting VMDK away afterward is wasted time and wasted host/network I/O. Because the FlashArray volume copy is a metadata operation, you can effectively “migrate” the data disk in seconds by leaving it on the vVol datastore during the svMotion using vSphere’s per-disk destination option, then quiesce the application, clone the data disk, and swap the detached vVol disk for the RDM clone as a quick offline step at the end.
Use this variant when the data disk is large enough that a normal svMotion would take hours, or when you’re trying to keep the cutover window short. The ordering below is deliberate: the svMotion happens first during normal hours, and the clone is taken after the application is stopped so the RDM you attach is data-consistent with the moment of cutover.
- Storage vMotion the VM (online, no outage). Start the migration as in Step 2 above, but on the storage selection page click Advanced (or Configure per disk) to pick a destination per VMDK. Send the VM home (config files) and the OS disk to your target VMFS datastore, and leave the data disk pointing at its current vVol datastore. The svMotion runs online and only moves the small files — the VM keeps running on its data disk the whole time. Do this during a normal change window; no outage required.
- Begin your scheduled outage and quiesce the data disk. Stop the application, then either power the VM off or take the volume offline / unmount the filesystem inside the guest so there are no in-flight writes. This is the moment that defines what the RDM will contain, which is why the clone happens after this step rather than before.
- Clone the data disk vVol on the FlashArray. Follow Step 1 above — identify the volume in the vSphere Pure Storage panel, copy it in the Purity UI, name the clone (e.g.,
vm-name-rdm-disk1), and map the new volume to the vSphere hosts where the VM will reside. Because the application is stopped, the clone is a consistent point-in-time copy of the data disk. - Detach the original data disk from the VM. Edit the VM settings and Remove from virtual machine (not Remove and delete files) if you want to keep the original vVol around as a safety net until you’ve validated the RDM. Since you already have an array-side clone, Remove and delete files is also safe and lets the vVol be reclaimed sooner.
- Attach the cloned volume as an RDM following Step 3 above. Where possible, attach it at the same SCSI bus/target the original data disk occupied — some guests key drive letters or device paths off it.
- Power the VM on (or bring the disk back online in the guest), restart the application, and validate before cleaning up the original vVol.
The end result is identical to the original three-step flow, but the bulk of the data never leaves the array. And unlike a “clone first” approach, the clone reflects the exact state of the data disk at the moment of cutover, so no writes are lost. For large data disks this is the difference between a multi-hour migration and a multi-minute outage.
Closing
While moving away from vVols might seem daunting, especially for VMs with unique disk requirements, a little planning goes a long way. Fortunately, most workloads will not require the extra step and can be storage vMotioned. See any discrepancies or have an idea for a new post? Reach out to me on Linkedin!