
Intro
I have a major confession to make. I’m not a Star Trek fan. It’s not for a lack of appreciation of the series, it’s more fate that my childhood was filled with Star Wars, Pokemon, Spongebob, and Invader Zim. So when I was researching some fun analogies for this blog, I started to regret that fate never brought me to this pop culture icon. Here is my best attempt to Star Trek fans everywhere!
In the original Star Trek, the transporter was a miracle of convenience. Step onto the pad, dissolve into light, and rematerialize somewhere else entirely. No shuttlecraft, no fuel burn, no atmospheric re-entry. The catch? It only worked if the pattern buffer had your signal locked and the Heisenberg compensators were online. One misconfiguration and you are scattered atoms. As one old colleague pointed out, there was one episode where someone was completely duplicated!
Migrating virtual machines from vSphere to OpenShift Virtualization is not all that different. Red Hat’s Migration Toolkit for Virtualization (MTV) is the transporter pad, your VMs are the away team, and Pure FlashArray is the subspace relay that determines whether your crew arrives via turbolift or via the pattern buffer itself.
This guide walks through two ways to teleport your VMs on FlashArray:
- VDDK Transport (the shuttlecraft), a reliable network-based transfer using VMware’s Virtual Disk Development Kit. Every byte travels from ESXi, across the network (usually the mgmt vmk), into OpenShift. It works everywhere, it is battle-tested, and for smaller VMs it is perfectly fine.
- XCOPY Storage Offload (the transporter), a storage-level copy that tells the Pure FlashArray to clone the VM’s disk data internally. The bits never leave the array. For large VMs this is dramatically faster, because you are eliminating the network bottleneck entirely.
Both methods use the same MTV operator, the same vSphere provider, and the same OpenShift cluster. The difference is in how you wire the storage map, and whether you are willing to do a little extra plumbing on the ESXi and FlashArray side.
Let’s get the crew aboard.
Part 1: What is MTV?
MTV (Migration Toolkit for Virtualization) is a Red Hat operator that migrates virtual machines from VMware vSphere (and other hypervisors) into OpenShift Virtualization. It handles the full lifecycle: inventory discovery, disk transfer, guest OS conversion via virt-v2v, and final VM creation as a KubeVirt VirtualMachine resource.
The migration pipeline looks like this:
- Initialize — MTV validates the plan and prepares the environment
- PreflightInspection — Checks the source VM configuration for compatibility
- DiskTransfer — Copies the VM’s disks to Persistent Volume Claims (PVCs) in OpenShift
- Cutover — For warm migrations, transfers the final changed blocks after the source VM is powered off
- ImageConversion — Runs
virt-v2vto inject VirtIO drivers and reconfigure the guest for KubeVirt - VirtualMachineCreation — Creates the KubeVirt VM resource
For VDDK migrations, steps 3 and 4 pull data over the network. For XCOPY offload, step 3 is an array-internal clone that completes in seconds regardless of disk size.
MTV lives in the
openshift-mtvnamespace. Your migrated VMs land in whatever target namespace you specify in the plan (e.g.,test-migrations). Think ofopenshift-mtvas the transporter room, and the target namespace as the destination deck.
If you have read some of my earlier blogs on HCX, lots of similarities but intended for moves from other hypervisors to OpenShift. MTV has more to do here though, since it’s got to replatform into KubeVirt.
Part 2: The Triad, vSphere, FlashArray, and OpenShift
Before you can beam anything anywhere, three systems need to be talking:
| System | Role | Key Requirements |
|---|---|---|
| vSphere / vCenter | Source hypervisor hosting the VMs | vCenter 7.x or 8.x, VMs on VMFS-6 datastores backed by FlashArray, SSH enabled on ESXi hosts (XCOPY only) |
| Pure FlashArray | Shared storage array | Hosts both the source VMFS datastore LUN and the target Portworx PVC LUNs, XCOPY requires both on the same physical array (and a pod as we will discuss further) |
| OpenShift | Destination platform | OpenShift 4.x with Virtualization operator, Portworx CSI providing StorageClasses backed by FlashArray, MTV operator installed |
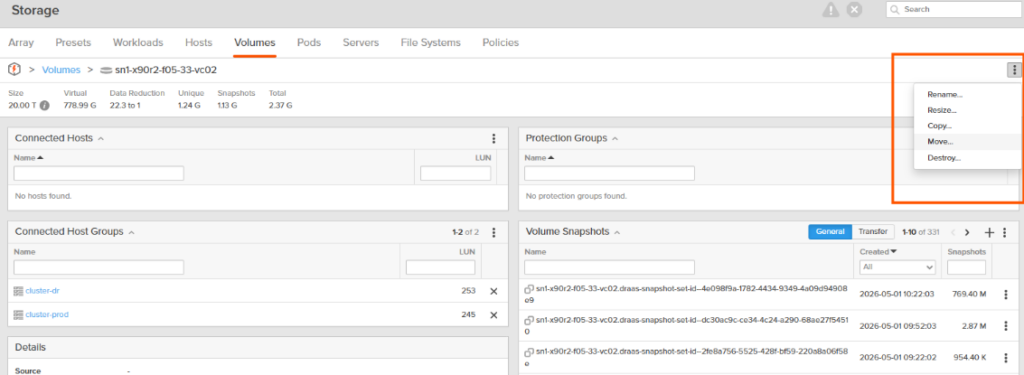
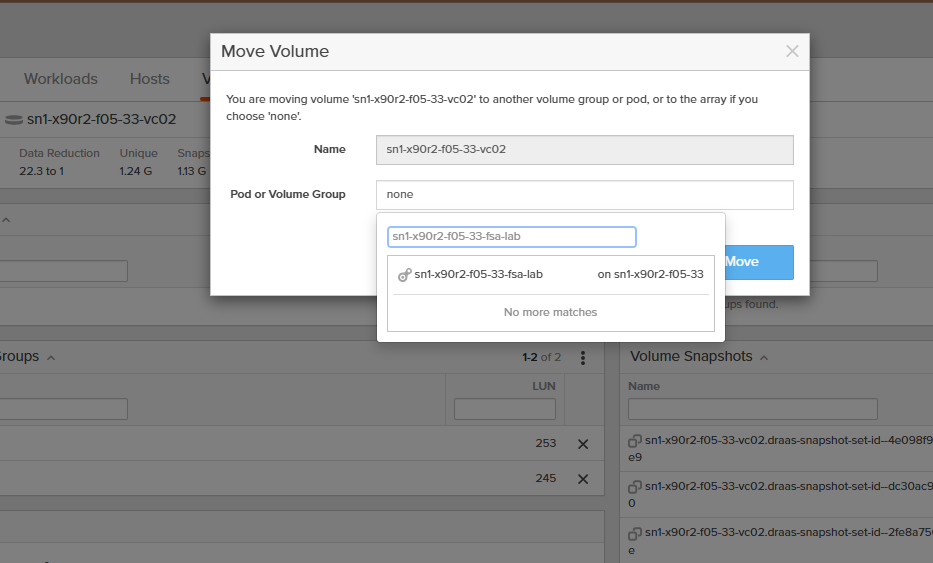
The critical architectural requirement for XCOPY: the source VMFS datastore and the destination Portworx StorageClass must both live on the same Pure FlashArray and in the same Pod. If they are on different arrays or Pods on that same array, XCOPY cannot work, the array has no way to do an internal clone across separate controllers. VDDK has no such restriction, it pulls data over the network regardless of storage topology.
Moving volumes between Pods on an array is a simple operation. But a critical prep component is making sure that the StorageClass called in the StorageMap for MTV is in the same Pod as the VMFS volume(s) your VMs are coming from!
Part 3: Installing MTV and Enabling Copy Offload
3.1 Install the Operator
From the OpenShift web console, navigate to Operators → OperatorHub and search for “Migration Toolkit for Virtualization.” Install it into the openshift-mtv namespace. The operator automatically creates a ForkliftController CR.
Verify from the CLI:
oc get forkliftcontrollers -n openshift-mtv
# Should show forklift-controller with status Ready
3.2 Enable Copy Offload
XCOPY offload is not enabled by default. Flip the feature flag:
oc patch forkliftcontrollers.forklift.konveyor.io forklift-controller \
  --type merge -p '{"spec": {"feature_copy_offload": "true"}}' -n openshift-mtv
Verify it took:
oc get forkliftcontrollers.forklift.konveyor.io forklift-controller \
  -n openshift-mtv -o jsonpath='{.spec.feature_copy_offload}{"\n"}'
# Should return: true
Part 4: Building and Pushing the VDDK Image
The VDDK image is required for VDDK-based migrations. It is not needed for XCOPY offload, but since we are setting up both methods, let’s get it done.
4.1 Download VDDK
Download the Virtual Disk Development Kit from developer.broadcom.com. Match the major version to your vSphere environment, for vSphere 8.x use VDDK 8.x.
Sometimes it doesn’t feel easy to get there, you could log in at https://support.broadcom.com then, once logged in, go directly to https://developer.broadcom.com to search for “VDDK”
4.2 Expose the Internal Registry
oc patch configs.imageregistry.operator.openshift.io/cluster \
  --type merge -p '{"spec":{"defaultRoute":true}}'
4.3 Build and Push
tar -xzf VMware-vix-disklib-8.0.3-23950268.x86_64.tar.gz

cat > Dockerfile <<'EOF'
FROM registry.access.redhat.com/ubi8/ubi-minimal
USER 1001
COPY vmware-vix-disklib-distrib /vmware-vix-disklib-distrib
RUN mkdir -p /opt
ENTRYPOINT ["cp", "-r", "/vmware-vix-disklib-distrib", "/opt"]
EOF

podman build -t vddk:8.0.3 .

REGISTRY=$(oc get route default-route -n openshift-image-registry \
  -o jsonpath='{.spec.host}')
podman login -u $(oc whoami) -p $(oc whoami -t) --tls-verify=false $REGISTRY
podman tag localhost/vddk:8.0.3 $REGISTRY/openshift-mtv/vddk:8.0.3
podman push --tls-verify=false $REGISTRY/openshift-mtv/vddk:8.0.3
The internal pull path for your Provider CR will be:
image-registry.openshift-image-registry.svc:5000/openshift-mtv/vddk:8.0.3
Critical: The Dockerfile
ENTRYPOINTmust be["cp", "-r", "/vmware-vix-disklib-distrib", "/opt"]. MTV runs this image as an init container to copy VDDK libraries into a shared volume. An incorrect entrypoint will cause migration pods to hang indefinitely.
4.4 Cross-Namespace Image Pull
MTV creates VDDK validation and migration pods in the target namespace (e.g., test-migrations), not openshift-mtv. By default, service accounts in the target namespace cannot pull images from openshift-mtv. Fix this once per target namespace:
oc adm policy add-role-to-group system:image-puller \
  system:serviceaccounts:test-migrations -n openshift-mtv
Part 5: Creating the vSphere Provider
The provider is the bridge between MTV and your vCenter. It is shared by both VDDK and XCOPY migration plans.
5.1 Create the Provider Secret
apiVersion: v1
kind: Secret
metadata:
  name: vsphere-secret
  namespace: openshift-mtv
type: Opaque
stringData:
  user: "<vcenter-user>"
  password: "<vcenter-password>"
  insecureSkipVerify: "true"
  url: "https://<vcenter-fqdn>/sdk"
5.2 Create the Provider
apiVersion: forklift.konveyor.io/v1beta1
kind: Provider
metadata:
  name: <provider-name>
  namespace: openshift-mtv
spec:
  type: vsphere
  url: "https://<vcenter-fqdn>/sdk"
  secret:
    name: vsphere-secret
    namespace: openshift-mtv
  settings:
    vddkInitImage: "image-registry.openshift-image-registry.svc:5000/openshift-mtv/vddk:8.0.3"
    sdkEndpoint: vcenter
    esxiCloneMethod: "ssh"
The esxiCloneMethod: "ssh" setting is what enables XCOPY offload. When this is set, MTV auto-generates an RSA key pair and stores it as a Kubernetes Secret.
Verify the provider is ready:
oc get provider <provider-name> -n openshift-mtv
# Wait for status: Ready
5.3 ESXi SSH Key Deployment (XCOPY Only)
When esxiCloneMethod: "ssh" is set, MTV needs SSH access to each ESXi host to run vmkfstools commands for XCOPY disk cloning. MTV generates a restricted public key that only permits its specific wrapper script, not general root shell access.
- Enable SSH on each ESXi host via vSphere Client (Host → Configure → Services → SSH → Start)
- Retrieve the restricted key from the Provider. The
SSHNotReadycondition includes asuggestionfield containing the full key string you need:
oc get provider <provider-name> -n openshift-mtv \
  -o jsonpath='{.status.conditions[?(@.type=="SSHNotReady")].suggestion}'
The output will be a long single line that starts with command="sh -c '...'",no-port-forwarding,no-agent-forwarding,no-X11-forwarding ssh-rsa AAAA... and this is the exact string you deploy in the next step.
- Deploy the key to each ESXi host’s
authorized_keys. Copy the entire output from step 2 and paste it in place of the example line below:
ssh root@<esxi-host-ip> 'cat >> /etc/ssh/keys-root/authorized_keys' <<'EOF'
command="sh -c '...'",no-port-forwarding,no-agent-forwarding,no-X11-forwarding ssh-rsa AAAA...<your key from step 2>
EOF
Repeat for every ESXi host in the cluster. The Provider’s SSHNotReady condition clears automatically once SSH connectivity is verified.
ESXi 8.0.3 Note: Only one
command=-restricted key entry should exist per MTV provider in theauthorized_keysfile. Multiple entries or bare (unrestricted) keys can cause SSH validation failures.
Part 6: The FlashArray Secret (XCOPY Only)
XCOPY offload needs credentials to communicate with the Pure FlashArray API. Create this secret in the openshift-mtv namespace:
# Discover your Portworx cluster prefix
CLUSTER_PREFIX=$(printf "px_%.8s" $(oc get storagecluster -A \
  -o=jsonpath='{.items[?(@.spec.cloudStorage.provider=="pure")].status.clusterUid}'))
echo $CLUSTER_PREFIX
apiVersion: v1
kind: Secret
metadata:
  name: pure-flasharray-secret
  namespace: openshift-mtv
type: Opaque
stringData:
  STORAGE_HOSTNAME: "<flasharray-mgmt-ip>"
  STORAGE_USERNAME: "<pure-admin-user>"
  STORAGE_PASSWORD: "<pure-admin-password>"
  PURE_CLUSTER_PREFIX: "<cluster-prefix>"
  STORAGE_SKIP_SSL_VERIFICATION: "true"
  GOVMOMI_HOSTNAME: "<vcenter-fqdn>"
  GOVMOMI_USERNAME: "<vcenter-user>"
  GOVMOMI_PASSWORD: "<vcenter-password>"
A few things to watch:
GOVMOMI_HOSTNAMEshould be the bare FQDN (e.g.,vc02.fsa.lab), not a full URL. Do not includehttps://.GOVMOMI_USERNAMEshould match the format used in your vSphere provider secret (e.g.,user@domain).GOVMOMI_PASSWORDshould match the password for that same vCenter account.
Pod-based StorageClasses: If your Portworx CSI StorageClass uses a Pure pod, the
PURE_CLUSTER_PREFIXmay need to be formatted asPodName::prefix. Alternatively, make sure that your source VMFS volume and StorageClass are not in a pod (in the default root pod.)
Part 7: Finding Your vSphere MoRef IDs
The storage maps, network maps, and migration plans all reference vSphere objects by their Managed Object Reference (MoRef) ID, not by their friendly display name. A MoRef is the internal identifier vSphere assigns to every object: datastores get datastore-XXXXX, distributed port groups get dvportgroup-XXXXX, and VMs get vm-XXXXX. You need these exact IDs when building your YAML manifests.
7.1 Using the MTV Inventory API
Once your vSphere provider is in a Ready state, MTV builds an inventory of all discovered objects. You can query it directly:
# Get your provider's UID
PROVIDER_UID=$(oc get provider <provider-name> -n openshift-mtv -o jsonpath='{.metadata.uid}')
TOKEN=$(oc whoami -t)
INVENTORY_URL="https://$(oc get route forklift-inventory -n openshift-mtv -o jsonpath='{.spec.host}')"

# List datastores (for storage map source IDs)
curl -sk -H "Authorization: Bearer $TOKEN" \
  "$INVENTORY_URL/providers/vsphere/$PROVIDER_UID/datastores" | python3 -m json.tool

# List networks (for network map source IDs)
curl -sk -H "Authorization: Bearer $TOKEN" \
  "$INVENTORY_URL/providers/vsphere/$PROVIDER_UID/networks" | python3 -m json.tool

# List VMs (for migration plan VM IDs)
curl -sk -H "Authorization: Bearer $TOKEN" \
  "$INVENTORY_URL/providers/vsphere/$PROVIDER_UID/vms" | python3 -m json.tool
Each response returns JSON with an id and name field. The id is the MoRef you need. For example:
{
  "id": "datastore-80097",
  "name": "sn1-x90r2-f05-33-vc02"
}
7.2 Using the MTV UI
If you prefer a visual approach, the MTV UI shows these IDs when you create maps and plans through the wizard. Navigate to Migration for Virtualization → Providers, click your vSphere provider, and browse the inventory. The UI will populate the MoRef IDs into the resources it creates.
7.3 Using the vSphere MOB (Managed Object Browser)
You can also find MoRef IDs directly from vCenter by browsing to https://<vcenter-fqdn>/mob. Navigate through the object hierarchy to find datastores, networks, and VMs. The moref column shows the ID you need. This method does not require MTV to be installed.
Part 8: Wiring the Storage Maps
This is where VDDK and XCOPY diverge. Each migration type needs its own storage map.
8.1 Storage Map for VDDK (Standard – Ship it all!)
This can be created from the MTV UI (Migration for Virtualization → Storage maps → Create storage map) or via CLI:
apiVersion: forklift.konveyor.io/v1beta1
kind: StorageMap
metadata:
  name: vddk-storage-map
  namespace: openshift-mtv
spec:
  map:
  - destination:
      storageClass: <portworx-storageclass>
      accessMode: ReadWriteMany
    source:
      id: <datastore-moref>          # e.g. datastore-80097
  provider:
    source: { name: <provider-name>, namespace: openshift-mtv }
    destination: { name: host, namespace: openshift-mtv }
8.2 Storage Map for XCOPY Offload (CLI Required)
The MTV UI does not expose the offloadPlugin fields, so this must be done via CLI:
apiVersion: forklift.konveyor.io/v1beta1
kind: StorageMap
metadata:
  name: xcopy-storage-map
  namespace: openshift-mtv
spec:
  map:
  - destination:
      storageClass: <portworx-storageclass>
      accessMode: ReadWriteMany
    offloadPlugin:
      vsphereXcopyConfig:
        secretRef: pure-flasharray-secret
        storageVendorProduct: pureFlashArray
    source:
      id: <datastore-moref>
  provider:
    source: { name: <provider-name>, namespace: openshift-mtv }
    destination: { name: host, namespace: openshift-mtv }
The offloadPlugin block tells MTV to use XCOPY against the Pure FlashArray using the credentials in pure-flasharray-secret.
You cannot mix VDDK and XCOPY storage mappings in a single migration plan. Each plan must use one type or the other.
Part 9: Network Map and Migration Plans
9.1 Network Map (Shared)
Both migration types share the same network map. Create this from the UI or CLI:
apiVersion: forklift.konveyor.io/v1beta1
kind: NetworkMap
metadata:
  name: network-map
  namespace: openshift-mtv
spec:
  map:
  - destination:
      type: pod                      # or "multus" with a NAD reference
    source:
      id: <network-moref>           # e.g. dvportgroup-75007
  provider:
    source: { name: <provider-name>, namespace: openshift-mtv }
    destination: { name: host, namespace: openshift-mtv }
9.2 VDDK Migration Plan
apiVersion: forklift.konveyor.io/v1beta1
kind: Plan
metadata:
  name: vddk-migration-plan
  namespace: openshift-mtv
spec:
  warm: false                        # cold migration
  provider:
    source: { name: <provider-name>, namespace: openshift-mtv }
    destination: { name: host, namespace: openshift-mtv }
  targetNamespace: test-migrations
  map:
    storage: { name: vddk-storage-map, namespace: openshift-mtv }
    network: { name: network-map, namespace: openshift-mtv }
  vms:
  - id: <vm-moref>                   # e.g. vm-80100
9.3 XCOPY Offload Migration Plan
apiVersion: forklift.konveyor.io/v1beta1
kind: Plan
metadata:
  name: xcopy-migration-plan
  namespace: openshift-mtv
spec:
  warm: false                        # cold migration recommended
  provider:
    source: { name: <provider-name>, namespace: openshift-mtv }
    destination: { name: host, namespace: openshift-mtv }
  targetNamespace: test-migrations
  map:
    storage: { name: xcopy-storage-map, namespace: openshift-mtv }
    network: { name: network-map, namespace: openshift-mtv }
  vms:
  - id: <vm-moref>                   # e.g. vm-80102
Why cold migration? Warm migration with XCOPY is Technology Preview in MTV 2.11. In my testing, the XCOPY populator completed the initial disk copy in seconds, but the cutover phase fell back to a full VDDK network transfer because there was no CBT baseline from the XCOPY path. Cold migration avoids this entirely, the XCOPY is the only data transfer. Warm migrations are fine for VDDK, but make sure you are testing to ensure CBT is working as expected.
9.4 Start the Migration
From the UI: Migration for Virtualization → Migration plans → click ▶ Start
From the CLI:
oc create -f - <<EOF
apiVersion: forklift.konveyor.io/v1beta1
kind: Migration
metadata:
  name: <migration-name>
  namespace: openshift-mtv
spec:
  plan:
    name: <plan-name>
    namespace: openshift-mtv
EOF
Part 10: Test Results, VDDK vs. XCOPY
We ran both migration types against identically configured VMs, each with a 40 GB OS disk and a 500 GB data disk, hosted on VMFS-6 datastores backed by the same Pure FlashArray.
VDDK Migration (mtv-test-01)
| Phase | Disk 1 (40 GB) | Disk 2 (500 GB) | Duration |
|---|---|---|---|
| DiskTransfer | 40,960 MB | 512,000 MB | ~41 min |
| Cutover | 40,960 MB | 512,000 MB | ~41 min |
| ImageConversion | — | — | ~2.5 min |
| Total | — | — | ~87 min |
The VDDK migration transferred the full disk contents twice (DiskTransfer + Cutover), because of the issues I was experiencing with CBT. This caused the cutover to perform a full re-transfer rather than a delta sync. I wouldn’t expect the cutover to be this long in normal operations.
XCOPY Offload Migration (mtv-test-02)
| Phase | Duration | Notes |
|---|---|---|
| DiskTransfer (XCOPY) | ~seconds | Array-internal clone, no network traffic |
| ImageConversion | ~2.5 min | virt-v2v driver injection, same as VDDK |
| Total | ~5 min | The bulk transfer was effectively instant |
The XCOPY migration completed the DiskTransfer phase in seconds. The only wall-clock time came from ImageConversion (virt-v2v), which is identical regardless of transfer method. Network throughput on the OpenShift worker nodes during XCOPY was effectively zero, the data never left the FlashArray.
The Scoreboard
| Metric | VDDK | XCOPY | Difference |
|---|---|---|---|
| Wall-clock time | ~87 min | ~5 min | ~17x faster |
| Network data transferred | ~1.08 TB | ~0 | Complete elimination |
| DiskTransfer phase | ~41 min | seconds | Array-internal |
| ImageConversion | ~2.5 min | ~2.5 min | Identical |
As mentioned before, CBT was not working correctly, so TBF the VDDK time would roughly halve to ~44 min, making XCOPY approximately 9x faster. Either way, the network savings are massive.
Part 11: Caveats and Gotchas from the Field
A few lessons from the transporter room that did not make it into the official docs:
1. CBT Matters for Warm Migrations
If you run warm migrations (VDDK or XCOPY), Changed Block Tracking must be enabled at both the VM level (ctkEnabled=TRUE) and per-disk (scsi0:X.ctkEnabled=TRUE). Missing per-disk CBT causes the cutover to do a full re-transfer, effectively doubling your migration time.
2. XCOPY Warm Migration doesn’t make much sense to me as-is
The XCOPY populator does not establish a CBT baseline. The cutover seems to fall back to a full VDDK transfer. Use cold migration for XCOPY. The label “cold” is misleading, it’s basically the equivalent of a “cutover” operation in MTV for warm migrations.
3. VM Snapshots Break XCOPY
VMware VAAI cannot offload sparse disk operations. Delete all snapshots before migrating. Linked clones have the same problem, promote to a full clone first.
4. Pure Pod StorageClasses Need Prefix Formatting
If your Portworx StorageClass uses a Pure pod, the PURE_CLUSTER_PREFIX in the FlashArray secret may need to be formatted as PodName::prefix. A StorageClass without pod references avoids this issue entirely.
5. ESXi 8.0.3 SSH Key Restrictions
ESXi 8.0.3 added stricter SSH key validation. Only one command=-restricted entry should exist per provider in authorized_keys. Extra entries or bare keys will cause validation failures with a cryptic “manual SSH key configuration” error.
6. Guest OS Type Warning
If vSphere reports the guest OS as genericLinuxGuest, MTV will flag the VM as “unsupported operating system.” Set the correct Guest OS type in vSphere VM settings (VM Options → Guest OS). The migration still succeeds, but the warning can be confusing.
7. Source VM Checklist
Unmount all CD-ROMs and ISOs before migration. Use thin-provisioned VMDKs on VMFS-6. Avoid independent disks, encrypted VMs (vSphere-level), and Secure Boot.
Wrap-Up
The transporter was science fiction. Storage copy offload is not. When the source VMFS datastore and the destination Portworx PVCs share the same Pure FlashArray, XCOPY turns a 40-minute network grind into a sub-second array operation. The virt-v2v conversion still takes a couple of minutes regardless, but the disk transfer, the phase that scales with VM size, is effectively free.
XCOPY will not make sense in all scenarios, VDDK is still the most flexible option. It’s very possible you will do a mix of these types in different migration waves. XCOPY is a great example of ingenuity where you can clone data directly off of the VMFS datastore.
Set phasers to migrate. 🖖