
Intro
Back in early 2024, most of us assumed the post-Broadcom migration would look like the flow of the Columbia River into the Pacific Ocean: a massive, singular current of users moving predictably from one giant ecosystem into another. We expected one “winner” to catch the wide swath of people exiting the VMware stage.
Instead, 2025 has shown us that the market is behaving a lot more like white light hitting a prism. Rather than a single stream, we’re seeing a massive dispersal of “shards of color” everywhere. Customers aren’t just moving to one place; they are diversifying into a dozen different directions based on their specific needs (if they are making the leap in the first place.)
One “color” in that spectrum is bright red! The rate of evolution within OpenShift Virtualization (the artist formerly known as KubeVirt) has been nothing short of breakneck. It’s no longer just a niche tool for running a stray VM next to a container; it’s becoming a legitimate, enterprise-grade landing zone.
This guide is meant for someone like me that has been hardwired into VMs, VMkernels, VMFS, vCenter, and Virtual Distributed Switches. Far from the world of Bonds, YAMLs, CRDs, and containers. Hopefully, this helps someone looking to get their first OpenShift Virtualization Cluster up and running!
References for this blog:
https://docs.portworx.com/portworx-enterprise/platform/install/pure-storage/flasharray
https://docs.redhat.com/en/documentation/openshift_container_platform/4.20/html/kubernetes_nmstate/k8s-nmstate-updating-node-network-config
Brief Intro To OpenShift
Red Hat OpenShift is a enterprise-grade, comprehensive application platform designed to be a consistent foundation across any infrastructure. Fundamentally, OpenShift is built on Kubernetes, but much more than just a container orchestration engine. As we will see today, OpenShift can be a platform for modernizing and deploying applications on containers but also support Virtual Machines.
In this scenario, we already have a FlashArray x70 configured with it’s NVMe over TCP interfaces up and ready for usage. Let’s get started!
Part 1: Creating The OpenShift Cluster via the Assisted Installer
1.1 The Assisted Installer
If you have not done so yet, you should make a Red Hat account on redhat.com as this will be your starting place. You will want to go to https://console.redhat.com to access what is called the “Assisted Installer.” There are a number of other ways to install OpenShift, but this is where I would recommend most people start. The account is completely free and allows you to trail these Red Hat tech!
Static IP’s require Mac Addresses:
I know a number of shops assign static IP’s at a infrastructure or bare metal level. You will need your interfaces MAC address to accomplish this. The most tried and true way i recommend doing this is to install RHEL on your systems so you can get the specific MAC’s throughip a
DNS Pre-Req
OpenShift will need two DNS entries in your configuration. The first will be a API ip addressapi.domain.localand the other will be your api ingress which will be*.<clustername>.domain.localYou do not need this until further in the installer, but doing this now will save you some time.
- Start at the console login page and select “Red Hat Openshift”
- Go to “Clusters” on the left side of your page and select “Create Cluster”
- On “Select an OpenShift cluster type to create” go to “Datacenter” and click “Create Cluster”
- Fill out cluster details:
- Cluster Name
- Base domain
- If you are applying static IP’s select the “Static, bridges, and bonds.” this will create a new section in the wizard
- Under static network configurations the template view is the easiest. Fill out:
- Select “IPv4”
- You likely will have a VLAN on this interface since it will be on the “front end” network. If its a dedicated interface for management you can leave this un-checked for an access config
- Fill out DNS
- Define the subnet for the management network and fill in the gateway
- On Host Specific Configurations:
- Choose if you will be using a bond or not on multiple interfaces
- Assign IP’s by adding the correlating hosts MAC address and their ip address
- On Operators, we will make sure that we tick the “Virtualization” bundle. This includes all the base operators needed to do OpenShift Virtualization. Click next…
- Next is Host Discovery:
- If you have generated a public key on your managment station, i would add it to the “SSH public key” section so you can get a SSH session to troubleshoot. The alternative is to get the ISO first and run a script to add a user/password
- Click “Provisioning type” and then “Full image file.”
- Then click “Generate Discover ISO”
- Grab the ISO through the generated Discovery ISO URL
- Mount the ISO onto your hosts and install OpenShift. There are no prompts during the install. If the networking is properly configured and assigned, you will see your hosts show up in the Host Discovery screen. Select them and click “next”
- Storage, need info
- Networking need info
- Configure your API IP assignement you did in your pre-req
- Configure your API ingress
- Review and create: Click Create Cluster
Tip – Getting into CoreOS with a Password:
There are two ways you can get into the CoreOS if you need to troubleshoot networking. One requires a script ran on the ISO before install. Another way if you have already loaded the ISO is to get into the grub. First, boot the system into the ISO, before the OS loads hiteto edit the grub
Second, in the grub, Find thelinuxline and addrd.breakthis should allow you in with no password
Once this has completed, you will have credentials for the kubeadmin role to login to your OpenShift cluster.
Part 2: Networking Configuration
2.1 Network Operators
Once we are in the OpenShift console, let’s get our networking configuration finished. We will install the “NMState Operator” if it is not installed already. To install an operator:
- On the left pane, go to “Ecosystem” -> Software Catalog
- Search NMState and click “Install”
2.2 Understanding the Topology
We are going to focus just on the storage network configuration of this section since we are focusing on OpenShift with FlashArray. A common configuration for customers is to have two interfaces for “front end” traffic and two interfaces for “storage.” It’s also common, but not required, to have two VLAN’s on the storage network for additional layers of redundancy. This type of configuration allows the most flexibility in troubleshooting, availability and performance. An example of what this would look like is in the diagram below. Usually this dedicated network will have jumbo frames
flowchart TD
    %% Define Top Level: Front End
    subgraph FE[Front End Network]
        direction LR
        FESW1[Front End Switch 1]
        FESW2[Front End Switch 2]
        FESW1 --- FESW2
    end

    %% Define Middle Level: OpenShift
    subgraph OCP[OpenShift Cluster]
        direction LR
        OCP1[Node 1<br/>4x NICs]
        OCP2[Node 2<br/>4x NICs]
        OCP3[Node 3<br/>4x NICs]
    end

    %% Define Lower Level: Storage Network
    subgraph SN[Storage Network]
        direction LR
        SW1[Storage Switch 1]
        SW2[Storage Switch 2]
        SW1 --- SW2
    end

    %% Define Bottom Level: FlashArray
    subgraph FA[FlashArray NVMe-TCP]
        direction LR
        CTRL1[Controller 1]
        CTRL2[Controller 2]
        NVME[(NVMe Namespace)]
        CTRL1 --- NVME
        CTRL2 --- NVME
    end

    %% Vertical Connections (Top Down)
    FESW1 --- OCP1 & OCP2 & OCP3
    FESW2 --- OCP1 & OCP2 & OCP3

    OCP1 & OCP2 & OCP3 --- SW1
    OCP1 & OCP2 & OCP3 --- SW2

    SW1 --- CTRL1 & CTRL2
    SW2 --- CTRL1 & CTRL2

    %% Styling
    style FESW1 fill:#605063,color:#fff
    style FESW2 fill:#605063,color:#fff
    style OCP1 fill:#2374ab,color:#fff
    style OCP2 fill:#2374ab,color:#fff
    style OCP3 fill:#2374ab,color:#fff
    style CTRL1 fill:#e67e22,color:#fff
    style CTRL2 fill:#e67e22,color:#fff
    style NVME fill:#27ae60,color:#fff
2.3 Applying Network Configurations
Now that we understand the topology. Let’s make a NNCP yaml configuration:
apiVersion: nmstate.io/v1
kind: NodeNetworkConfigurationPolicy
metadata:
  name: storage-active-backup-node1
spec:
  nodeSelector:
    kubernetes.io/hostname: "node1.example.com"
  desiredState:
    interfaces:
    # 1. Physical Interfaces with Jumbo Frames
    - name: NIC3
      type: ethernet
      state: up
      mtu: 9000
    - name: NIC4
      type: ethernet
      state: up
      mtu: 9000

    # 2. Create Active/Standby Bond
    - name: bond-storage
      type: bond
      state: up
      mtu: 9000
      link-aggregation:
        mode: active-backup # Non-LACP Failover
        port:
        - NIC3
        - NIC4
        options:
          miimon: '100' # Check link status every 100ms

    # 3. VLAN 20 on the Bond (Static IP)
    - name: bond-storage.20
      type: vlan
      state: up
      mtu: 9000
      vlan:
        base-iface: bond-storage
        id: 20
      ipv4:
        address:
        - ip: 10.10.20.11 # node specific IP, change for each node
          prefix-length: 24
        enabled: true

    # 4. VLAN 40 on the Bond (Static IP)
    - name: bond-storage.40
      type: vlan
      state: up
      mtu: 9000
      vlan:
        base-iface: bond-storage
        id: 40
      ipv4:
        address:
        - ip: 10.10.40.11 # node specific IP, change for each node
          prefix-length: 24
        enabled: true
To apply this configuration, we will need to make three NNCP’s.
- Go to the left pane of the OpenShift UI and select “Networking” -> NodeNetworkConfigurationPolicy
- Create -> With YAML
- Paste the configuration for node
- Click save
- Repeat for all nodes in the cluster, updating the necessary
Tip: Download OC Command Line
You will want to download the OC command line tool. This will work in windows or linux environments. In the OpenShift UI go to the top right hand corner with the Question Mark ? and select Command Line Tools and download for your management station operating system.
2.4 Verifying Connectivity
With the OC command line tool, you can login to your host remotely and verify network connectivity:
PS C:\Users\Administrator\Downloads> .\oc.exe get nodes
NAME                STATUS   ROLES                         AGE   VERSION
70-da-48-01-87-68   Ready    control-plane,master,worker   9d    v1.33.6
70-da-48-41-30-04   Ready    control-plane,master,worker   9d    v1.33.6
a0-bc-6f-66-96-00   Ready    control-plane,master,worker   9d    v1.33.6
PS C:\Users\Administrator\Downloads> .\oc.exe debug node/a0-bc-6f-66-96-00
Starting pod/a0-bc-6f-66-96-00-debug-t2zzt ...
To use host binaries, run `chroot /host`. Instead, if you need to access host namespaces, run `nsenter -a -t 1`.
Pod IP: 10.10.10.12
If you don't see a command prompt, try pressing enter.
sh-5.1# shroot /host
sh: shroot: command not found
sh-5.1# ping -I eno4.20 10.10.20.50
PING 10.10.20.50 (10.10.20.50) from 10.10.20.12 eno4.20: 56(84) bytes of data.
64 bytes from 10.10.20.50: icmp_seq=1 ttl=64 time=0.088 ms
64 bytes from 10.10.20.50: icmp_seq=2 ttl=64 time=0.062 ms
64 bytes from 10.10.20.50: icmp_seq=3 ttl=64 time=0.069 ms
64 bytes from 10.10.20.50: icmp_seq=4 ttl=64 time=0.072 ms
64 bytes from 10.10.20.50: icmp_seq=5 ttl=64 time=0.070 ms
64 bytes from 10.10.20.50: icmp_seq=6 ttl=64 time=0.067 ms
Part 3: MachineConfig Optimizations for NVMe
Since we are using NVMe over TCP, there are a couple of unique configurations we need to apply to our nodes that are different than Fibre Channel or iSCSI configurations. These largely could be used for those, but there may be slight nuance. I have put in these MachineConfigs a number of recommendation based on Portworx documentation as well as some things I found in an install that might be important. It’s important to note that today, portworx does not support Native NVMe Multipath and requires DM-Multipath to work. This will have to be encoded in a single-line, Base64 string, along with the udev rules so we can input that encoded content in the YAML configuration
! MachineConfigs Will Reboot Nodes:
Applying a MachineConfig will start a rolling reboot of the cluster, this is important to know if you are applying these updates while the cluster is serving production workloads.
3.1 Encoding udev rules and multipath.conf if you are on Windows
- Create your files
- Udev rules could be made into a “90-nvme-scheduler.rules” with the plain text file including
ACTION=="add|change", KERNEL=="nvme[0-9]*n[0-9]*", ATTR{*/queue/scheduler}="none" - Multipath could be put into a “multipath.conf” with the following
- Udev rules could be made into a “90-nvme-scheduler.rules” with the plain text file including
defaults {
    user_friendly_names no
    enable_foreign "^$"
    polling_interval    10
    find_multipaths no
}

devices {
    device {
        vendor                      "NVME"
        product                     "Pure Storage FlashArray"
        path_selector               "queue-length 0"
        path_grouping_policy        group_by_prio
        prio                        ana
        failback                    immediate
        fast_io_fail_tmo            10
        user_friendly_names         no
        no_path_retry               0
        features                    0
        dev_loss_tmo                60
    }
    device {
        vendor                   "PURE"
        product                  "FlashArray"
        path_selector            "service-time 0"
        hardware_handler         "1 alua"
        path_grouping_policy     group_by_prio
        prio                     alua
        failback                 immediate
        path_checker             tur
        fast_io_fail_tmo         10
        user_friendly_names      no
        no_path_retry            0
        features                 0
        dev_loss_tmo             600
    }
}

blacklist_exceptions {
        property "(SCSI_IDENT_|ID_WWN)"
}

blacklist {
      devnode "^pxd[0-9]*"
      devnode "^pxd*"
      device {
        vendor "VMware"
        product "Virtual disk"
      }
}- Encode the files into strings using PowerShell
Udev rules
$Bytes = [System.Text.Encoding]::UTF8.GetBytes((Get-Content -Raw .\90-nvme-scheduler.rules))
[Convert]::ToBase64String($Bytes)
Multipath.conf rules
$Bytes = [System.Text.Encoding]::UTF8.GetBytes((Get-Content -Raw .\multipath.conf))
[Convert]::ToBase64String($Bytes)
You will need these outputs of these commands to insert in your MachineConfigs YAML in the next step
3.2 Applying MachineConfigs
- In the OpenShift UI go to the left pane and select Compute -> MachineConfigs
- Click “Create MachineConfig”
- In our MachineConfig this is where we put our encoded configurations (see “source:” in each block)
- Example YAML for the optimizations:
3/20/26 update this block below had the udev and multipath swapped. If you used this prior… my bad 🙁
I’ll also mention that the nqn regeneration is specific to my configuration, you may want to consider changing the hostid as well. I’ve heard the Openshift team is invetigating having these be randomized by default. Those changes would be made in execstart like this:ExecStart=/bin/sh -c 'if [ "$(cat /etc/nvme/hostnqn)" = "<host-nqn>" ]; then /usr/sbin/nvme gen-hostnqn > /etc/nvme/hostnqn; fi; if [ "$(cat /etc/nvme/hostid)" = "<duplicate-hostid>" ]; then cat /proc/sys/kernel/random/uuid > /etc/nvme/hostid; fi'
apiVersion: machineconfiguration.openshift.io/v1
kind: MachineConfig
metadata:
  labels:
    machineconfiguration.openshift.io/role: worker # note "master" would be used if you are running a consolidated Master/Worker config. "worker" would be the role if you have seperate nodes for master/worker nodes
  name: 99-px-nvme-optimization
spec:
  # 3. Kernel Arguments: Disable Native NVMe Multipath
  kernelArguments:
    - nvme_core.multipath=N
  config:
    ignition:
      version: 3.2.0
    storage:
      files:
      # 1. Udev Rule: Set NVMe Scheduler to 'none'
      - contents:
          source: data:text/plain;charset=utf-8;base64,QUNUSU9OPT0iYWRkfGNoYW5nZSIsIEtFUk5FTD09Im52bWVbMC05XSpuWzAtOV0qIiwgQVRUUnsqL3F1ZXVlL3NjaGVkdWxlcn09Im5vbmUiCg==
        mode: 0644
        path: /etc/udev/rules.d/60-nvme-scheduler.rules

      # 2. Multipath Config: Optimization for Pure FlashArray
      - contents:
          source: data:text/plain;charset=utf-8;base64,ZGVmYXVsdHMgew0KICAgIHVzZXJfZnJpZW5kbHlfbmFtZXMgbm8NCiAgICBlbmFibGVfZm9yZWlnbiAiXiQiDQogICAgcG9sbGluZ19pbnRlcnZhbCAgICAxMA0KICAgIGZpbmRfbXVsdGlwYXRocyBubw0KfQ0KDQpkZXZpY2VzIHsNCiAgICBkZXZpY2Ugew0KICAgICAgICB2ZW5kb3IgICAgICAgICAgICAgICAgICAgICAgIk5WTUUiDQogICAgICAgIHByb2R1Y3QgICAgICAgICAgICAgICAgICAgICAiUHVyZSBTdG9yYWdlIEZsYXNoQXJyYXkiDQogICAgICAgIHBhdGhfc2VsZWN0b3IgICAgICAgICAgICAgICAicXVldWUtbGVuZ3RoIDAiDQogICAgICAgIHBhdGhfZ3JvdXBpbmdfcG9saWN5ICAgICAgICBncm91cF9ieV9wcmlvDQogICAgICAgIHByaW8gICAgICAgICAgICAgICAgICAgICAgICBhbmENCiAgICAgICAgZmFpbGJhY2sgICAgICAgICAgICAgICAgICAgIGltbWVkaWF0ZQ0KICAgICAgICBmYXN0X2lvX2ZhaWxfdG1vICAgICAgICAgICAgMTANCiAgICAgICAgdXNlcl9mcmllbmRseV9uYW1lcyAgICAgICAgIG5vDQogICAgICAgIG5vX3BhdGhfcmV0cnkgICAgICAgICAgICAgICAwDQogICAgICAgIGZlYXR1cmVzICAgICAgICAgICAgICAgICAgICAwDQogICAgICAgIGRldl9sb3NzX3RtbyAgICAgICAgICAgICAgICA2MA0KICAgIH0NCiAgICBkZXZpY2Ugew0KICAgICAgICB2ZW5kb3IgICAgICAgICAgICAgICAgICAgIlBVUkUiDQogICAgICAgIHByb2R1Y3QgICAgICAgICAgICAgICAgICAiRmxhc2hBcnJheSINCiAgICAgICAgcGF0aF9zZWxlY3RvciAgICAgICAgICAgICJzZXJ2aWNlLXRpbWUgMCINCiAgICAgICAgaGFyZHdhcmVfaGFuZGxlciAgICAgICAgICIxIGFsdWEiDQogICAgICAgIHBhdGhfZ3JvdXBpbmdfcG9saWN5ICAgICBncm91cF9ieV9wcmlvDQogICAgICAgIHByaW8gICAgICAgICAgICAgICAgICAgICBhbHVhDQogICAgICAgIGZhaWxiYWNrICAgICAgICAgICAgICAgICBpbW1lZGlhdGUNCiAgICAgICAgcGF0aF9jaGVja2VyICAgICAgICAgICAgIHR1cg0KICAgICAgICBmYXN0X2lvX2ZhaWxfdG1vICAgICAgICAgMTANCiAgICAgICAgdXNlcl9mcmllbmRseV9uYW1lcyAgICAgIG5vDQogICAgICAgIG5vX3BhdGhfcmV0cnkgICAgICAgICAgICAwDQogICAgICAgIGZlYXR1cmVzICAgICAgICAgICAgICAgICAwDQogICAgICAgIGRldl9sb3NzX3RtbyAgICAgICAgICAgICA2MDANCiAgICB9DQp9DQoNCmJsYWNrbGlzdF9leGNlcHRpb25zIHsNCiAgICAgICAgcHJvcGVydHkgIihTQ1NJX0lERU5UX3xJRF9XV04pIg0KfQ0KDQpibGFja2xpc3Qgew0KICAgICAgZGV2bm9kZSAiXnB4ZFswLTldKiINCiAgICAgIGRldm5vZGUgIl5weGQqIg0KICAgICAgZGV2aWNlIHsNCiAgICAgICAgdmVuZG9yICJWTXdhcmUiDQogICAgICAgIHByb2R1Y3QgIlZpcnR1YWwgZGlzayINCiAgICAgIH0NCn0=
        mode: 0644
        path: /etc/multipath.conf

    # 4. Create unique NQN's per host
    systemd:
      units:
      - name: fix-duplicate-nqn.service
        enabled: true
        contents: |
          [Unit]
          Description=Fix duplicate NVMe Host NQN
          Before=network-online.target
          [Service]
          Type=oneshot
          ExecStart=/bin/sh -c 'if [ "$(cat /etc/nvme/hostnqn)" = "nqn.2014-08.org.nvmexpress:uuid:4957c8e0-5f22-4a3c-8375-d2767419bd78" ]; then /usr/sbin/nvme gen-hostnqn > /etc/nvme/hostnqn; fi'
          RemainAfterExit=yes
          [Install]
          WantedBy=multi-user.target
Note: Master and Worker Nodes
If you notice that your nodes are not rebooting after applying the configuration, make sure you have the proper “master” or “worker” node in themachineconfiguration.openshift.io/role:section
Part 3: Configuring Portworx CSI
One of our final steps will be to configure the Portworx operator to allow it to be the Container Storage Interface (CSI) for our FlashArray.
3.1 Download the Portworx Operator
- In the left pane of Openshift UI, go to Ecosystem -> Software Catalog
- Search for “Portworx”
- Under “Project” Create a new project called “portworx” and select it
- I recommend clicking “Enabled” for the plug-in
- Click Install
3.2 Configuring Portworx as FlashArray’s CSI
First, let’s create our credentials for our FlashArray that our Portwrox CSI will use to create storage resources.
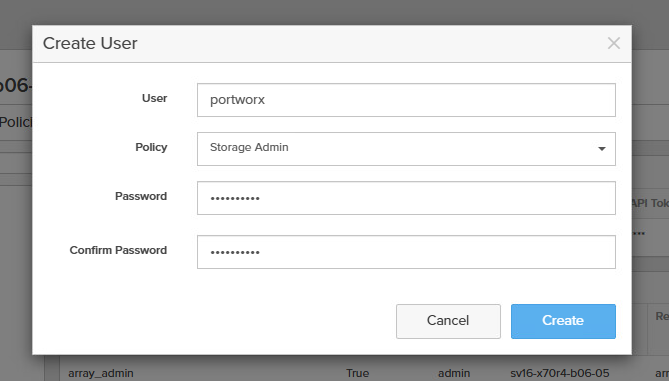
- Create a service account for portworx by going to Settings -> Users and Policies then in the Users section click the 3 dots on the top right and Create User.
- The user should have Storage Admin permissions
- Now Click on the 3 dots and click Create API Token
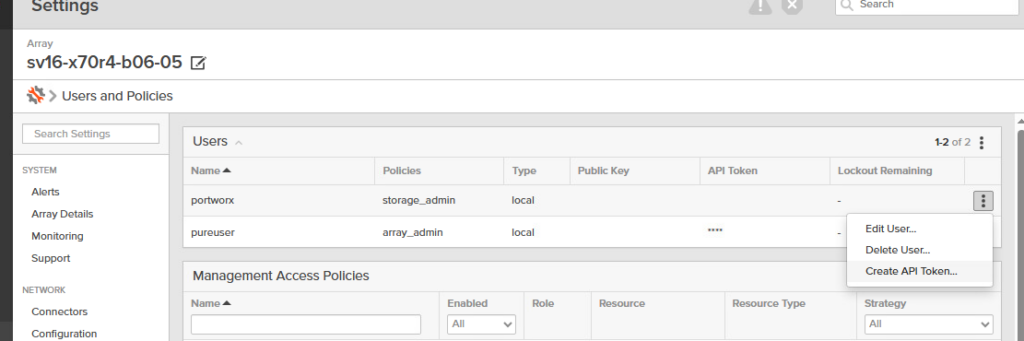
- Specify an expiration date (if it is left blank the key does not expire.)
- Copy the key somewhere safe, this will be needed in a future step
- Create a pure.json file with the following contents
{
  "FlashArrays": [
    {
      "MgmtEndPoint": "<fa-management-endpoint>",
      "APIToken": "<fa-api-token>"
    }
  ]
}- Create the secret in the portworx namespace
– Command line:oc create secret generic px-pure-secret --namespace <stc-namespace> --from-file=pure.json=<file path>
– Openshift UI: Workloads -> Secrets ->. Ensure you are in the portworx project. Select Create -> Key/Value Secret and fill out the details with Name “Portworx” Key “pure.json” and upload your file by selecting it in the value section “browse.” then click create
Note: Multi-Array Setup
If you would like to setup multiple arrays. This can be done with pods. Check out this blog post on how to do this.
We will need to configure both a Storage Cluster and a Storage Class. It’s recommended to make a spec on at Portwrox Centeral. However i have a example spec that you can review in these steps
- Go to Ecosystem -> Installed Operators and search Portworx and click on the operator
- Click on Storage Cluster inside the Portwrox pane along the top
- Click on Create StorageCluster
kind: StorageCluster
apiVersion: core.libopenstorage.org/v1
metadata:
  name: px-cluster
  namespace: portworx
  annotations:
    portworx.io/install-source: "https://install.portworx.com/25.8?oem=px-csi&operator=true&ce=pure&csi=true&stork=false&kbver=1.33.6&ns=portworx&osft=true&c=px-cluster-cf38c585-4e07-4296-9c46-84b0ea423aa6&pureSanType=NVMEOF-TCP&tel=true"
    portworx.io/is-openshift: "true"
    portworx.io/misc-args: "--oem px-csi"
spec:
  image: portworx/px-pure-csi-driver:25.8.1
  imagePullPolicy: Always
  csi:
    enabled: true
  monitoring:
    telemetry:
      enabled: true
    prometheus:
      exportMetrics: true
  env:
  - name: PURE_FLASHARRAY_SAN_TYPE # Specify NVMe over TCP
    value: "NVMEOF-TCP"
  - name: PURE_NVME_ALLOWED_CIDRS # Specify which cidr ranges for storage
    value: "10.10.20.0/24"
    value: "10.10.40.0/24"
- Click Save
Once the StorageCluster is applied, you should see multiple containers start spinning up. oc get pod -n portworx -w
Part 4: Consuming FlashArray Storage in OpenShift Virtualization
4.1 The FlashArray-Backed StorageClass
Next, we create a StorageClass to specify how portworx deploys storage in this configuration. We will be leveraging the “pure-block” spec to specify that portworx hands off direct volumes to FlashArray. Portworx Enterprise provides a robust set of capabilities to replicate, backup, and recover Kubernetes resources which are covered in other articles. Here we are just looking at using FlashArray specifically.
- In the Openshift UI: Left pane Storage -> StorageClasses Create
- Click “Edity YAML
apiVersion: storage.k8s.io/v1
kind: StorageClass
metadata:
  annotations:
    storageclass.kubernetes.io/is-default-class: "true"
  name: fada-rwx-sc
parameters:
  backend: "pure_block"
provisioner: pxd.portworx.com
volumeBindingMode: WaitForFirstConsumer
allowVolumeExpansion: true
4.2 Provisioning the VM
Now we are on the home stretch. If your StorageCluster and StorageClass configuration are accurate, you should see images being pulled down for OpenShift Virtualization. You can watch this by oc get pvc -A -w and oc get all -n openshift-virtualization-os-images. After this is done, in the Openshift UI you should see little blue bubbles for images as seen here in the Virtualization -> Virtual Machines -> Create “from template”
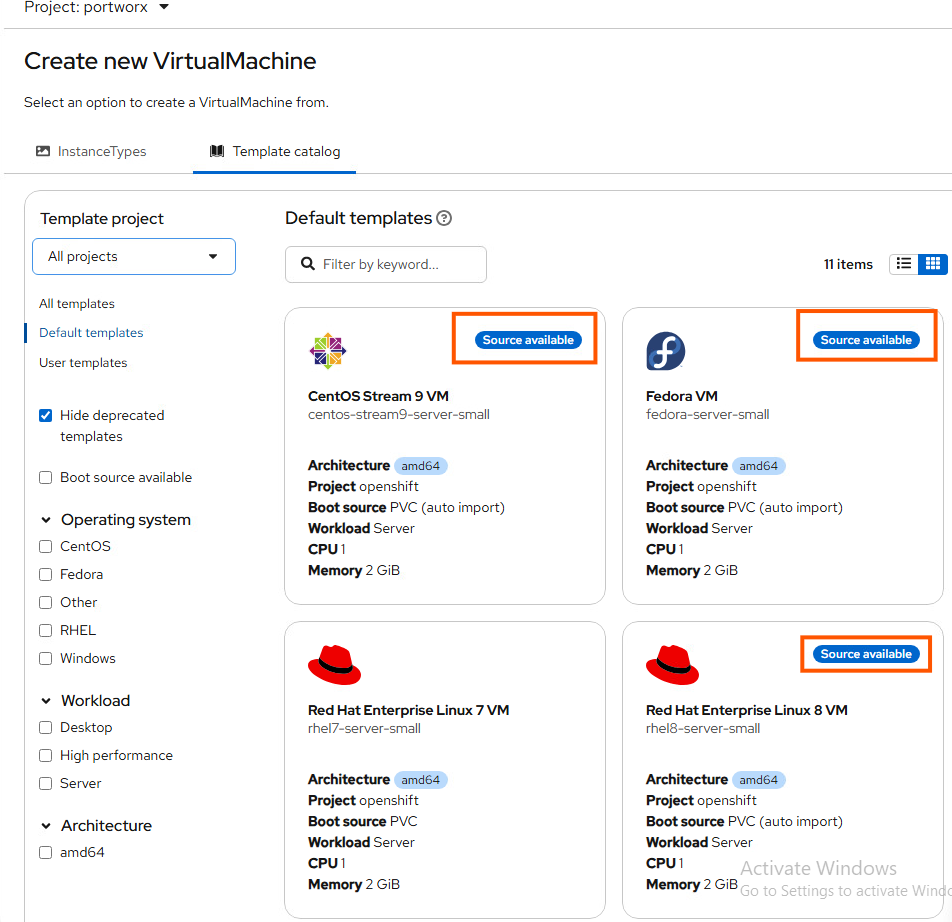
To deploy a VM, click on an image you want to use and select “create.”
4.4 NetworkAttachementDefinitions
You will want to create a NetworkAttachementDefinition or NAD. A NAD is a Custom Resource Definition (CRD) that allows you to attach a VM to one or more networks. This is not a robust overview of how to properly setup your “front end” network for VM’s. But a quick way to specify a VLAN on the primary Openshift interfaces to connect VM’s and run tests.
- Go to Networking -> NetworkAttachmentDefinitions and click Create NetworkAttachmentDefinition
apiVersion: "k8s.cni.cncf.io/v1"
kind: NetworkAttachmentDefinition
metadata:
  name: vlan-3518-static # name that will show up in a next step
  namespace: default
spec:
  config: '{
      "cniVersion": "0.3.1",
      "type": "vlan",
      "master": "eno6",
      "vlanId": 3518,
      "ipam": {
        "type": "host-local",
        "ranges": [
          [
            {
              "subnet": "10.23.18.0/24", # allowed ranges
              "rangeStart": "10.23.18.20",
              "rangeEnd": "10.23.18.40",
              "gateway": "10.23.18.1"
            }
          ]
        ]
      }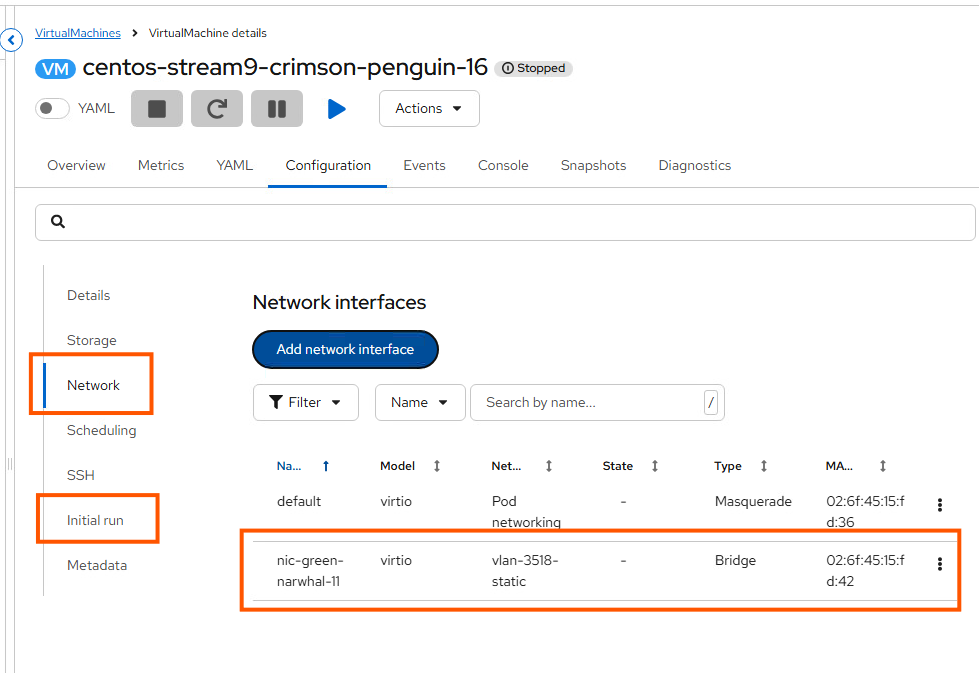
}'- Got to your Virtual Machine and go to Configuration and then find Network
- Add Add Network Interfaces. Make sure to select your NAD and click Save
- To assign a static IP address to the VM, go to Initial run just below the Networking section you were just in
- Click Edit by Cloud-init
- Select the Add network data and specify the IP address
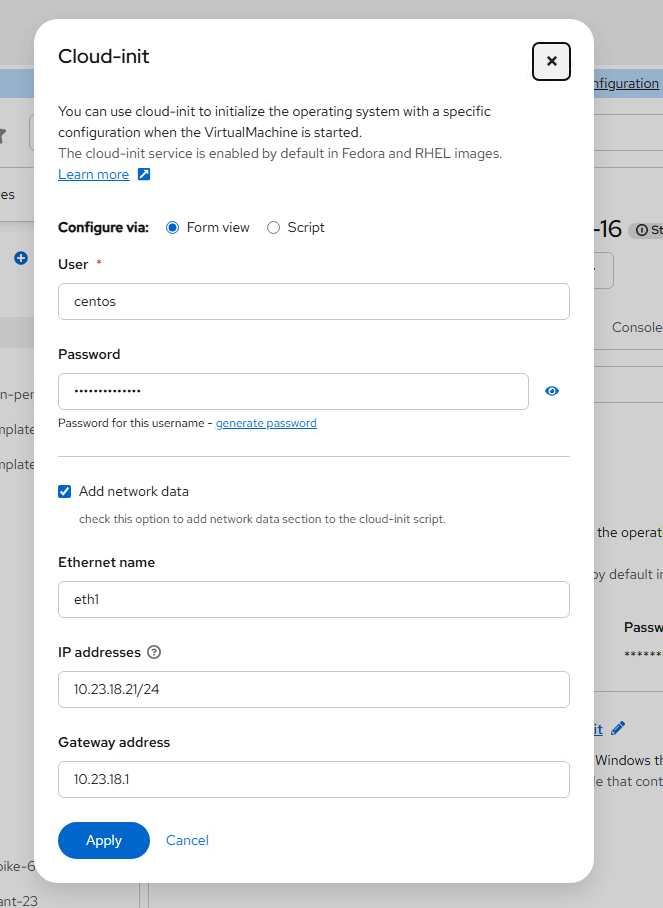
- Reboot the VM
After the VM is rebooted, you should be able to ping the VM. There are additional steps to setup SSH that I will update later on.
Wrap-Up
The concludes this step-by-step guide. Did you find it helpful? If you have any feedback positive or negative, please reach out to me on Linkedin!